Posted on Leave a comment

The Bathroom Plant

Was it 1966? A friend of a friend was looking for temporary workers, just a few. Seems there was a new fad in town – terrariums. He did the math; tall glass vessel + soil + a few small plants = cash for college. He set up a kiosk at the local shopping mall. To call it a mall is laughable compared with today’s monstrous shopping arenas. His terrariums were selling fast and he couldn’t keep up with demand on his own. He needed help and he needed it fast…and cheap.

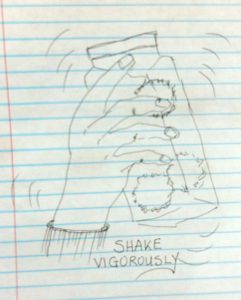
So we stood in his garage, a motley crew of skinny teens. If you’ve ever attempted to assemble a terrarium you’ll soon discover that you are all thumbs and elbows. We were paid fifty cents for each completed terrarium – and we worked quickly. We soon developed little tricks to get those feisty plants tucked inside the tall glass containers. We used wire, forks, anything that came to hand. One particularly busy day, our ‘boss’ thoughtfully supplied a lunch of Chinese take-out and we discovered that chopsticks could be modified and fitted with all manner of appendages to aid us in our task. Our creations were selling for five to ten dollars each.

A short time later, I started working at a real job. After school and weekends and full time in the summer, I was a floral designer. At work one day I was holding up my end of a friendly conversation and I remarked how industrious that young college student had been to start with nothing and develop his own terrarium business. My boss, who had been in the floral business forever, commented, “Well, the young man knew what he was doing; his mother owns Lola’s Flower Shop across town and is our biggest competitor.” Oops!

A few years later, walking through the same mall, I passed a display of lush hanging plants. A few sprigs had fallen to the floor and were doomed to be victims of the broom. I picked up an extra long piece of some unknown plant, playing with it as I walked – twirled it, threw it in the air, wrapped it bracelet-like around my wrist, then stuffed it into a pocket. With my vast experience manufacturing terrariums, I had big plans to make a terrarium of my own with that little sprig.

Arriving home, I stuck the little plant sprig in some water, set it on the windowsill and forgot all about it. Later I did manage to create several terrariums of my own, but the little plant never made it from the water into any of my terrariums. Weeks later, when I looked at the little plant, it had quite a nice bunch of roots, so I planted it in a pot.

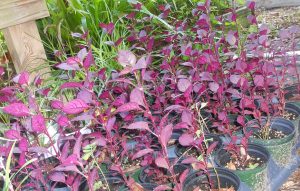
That little plant has been through one marriage, two apartments, 3 houses, two children, one divorce. The still-unidentified plant usually lived in the bathroom and, for lack of a better name, it was known as ‘the bathroom plant’. The plant traveled along with me when I moved to South Georgia. Imagine how surprised I was to find that the lush, green weeds growing all around my new home looked suspiciously like the bathroom plant.

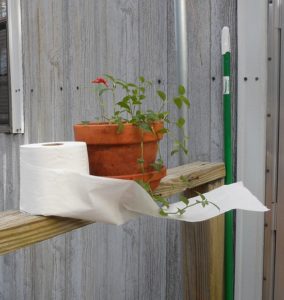
The research revealed that my little plant had a name, a proper name. Tradescantia fluminensis! Sure, it still lives in the bathroom; it’s happy there. But on days when the rain is gently falling, I set it outside to have a little shower with its Southern cousins.


Posted on Leave a comment

All This and the Kitchen Skink.

The other day there was a Skink in my kitchen.

Skinks do not belong in the kitchen.

Yes, I admit that my house is disorganized with entirely too much stuff, but I have never described my mess as “Everything including the kitchen Skink“.

Well, I spent a few nights worrying like an overprotective skink-mother. Why were you worried? Because there are two dogs in the house and one of them (I won’t tell you that his name is Jack) tries to eat lizards even when they taste nasty. Eeeww!

The next day Jack and I were walking around in the yard. He likes to jump up onto the deck. Okay, the truth is that he is too short to make the leap; I actually have to lift him up there, but let’s keep his dignity intact and say he jumps up all by himself. He noses around for a minute or two hoping for a tasty morsel. Wood roaches are tasty. Then he makes a mad leap and dives headfirst into a 5-gallon plastic bucket. Whoa!!! It could be anything – a snake, a spider, an inch of water he could drown in. Doesn’t Jack read the warning on the side of the bucket? 

No, Jack no. Please, just let me have a little look first.

Well, would you look at that!

Here, look for yourself –


Let me get in a little closer – here you go –


Isn’t that just the cutest Skink in the whole world. It’s kind of dark in the bucket; we need a closer look, please.

C’mon into the light Skink, show us your pretty blue tail… 

Fun time is over. The Skink is developing an attitude and it’s time to turn it loose.

If there is a lesson to learn it is this:

If a Skink can find its way into your kitchen, it must also know how to let himself out so don’t lose any sleep worrying about it. Also, if you keep plastic buckets around to catch rainwater, check them not only for mosquitoes but for Skinks as well. Maybe you should write a tutorial showing how to make screen lids for 5-gallon buckets? 

For more information about lizards with blue tails, check this link for Hilton Pond:

http://www.hiltonpond.org/ThisWeek071001.html

Eumeces fasciatus = Five-lined Skink

E. inexpectatus = Southeastern Five-lined Skink

Taxonomists are forever changing the name of things. Here is the Catalog of Life page for the Five-lined Skink with the currently accepted name Plestiodon fasciatus. Who knows? By the time you read this, the name could change again!

http://www.catalogueoflife.org/col/details/species/id/7083c8e865d1e893839b07e3fa809dce

Plestiodon laticeips = Broadhead/Broad-Head Skink. Hmmm, apparently, using the V-shape marking on the head is not the proper way to identify a Skink. There are three types of Skink residing in my part of the world and when they are young, they can look alike, having stripes and a bright blue tail. A better way is to count the labial scales – I see 5 scales so I think that my Skink is an immature Broadhead Skink.

This link shows where the labial scales are located:

http://www.virginiaherpetologicalsociety.com/reptiles/lizards/broad-head-skink/broad-headed_skink.php

Posted on 1 Comment

When there are trolls in the Garden, it’s time to leave.

Here is an excellent example of why I am no longer making public posts over on my old favorite plant/gardening site.

I had been in the process of writing an article for NGA. The article was not yet finished but I posted a bit of information and a few images to help folks who inquired how to decrease the population of biting flies.

Here is my original post:
https://garden.org/thread/view…

Someone who trolls the internet attempting to make others look ignorant quoted my idea and then, attempting to discredit my original idea, posted a photo they found on the internet claiming the photo showed a man in a football helmet stuck with glue to the side of a building which is, of course, incorrect information. The poster also judges incorrectly thinking the image is from the 1950’s. Find the post here (and, by the way, the person has already edited the post once and could edit it again):
https://garden.org/thread/view…

I believe the poster was referring to the old television ads for Krazy Glue. This is the commercial, which, by the way, shows a man not in a football helmet, but in a construction hardhat – not the same thing at all:
https://videosift.com/video/Kr…

If the troll had bothered to research the photo a bit more they could have learned that this same image has been used in many places on the internet. And almost all are wrong. The result of insufficient research.

In one place on the internet, the photo was used to show a man supposedly wearing a football helmet running headlong into the side of a building to prove the helmet protects the head. Nope, not correct.
https://www.historyinorbit.com…

The image has also been used here claiming to show a rugby helmet being tested in 1912 (again, that is incorrect but at least they got the date right):
http://amorq.com/article/4918/…

And here again (see photo #19 and again, it is incorrect – not a rugby helmet):
https://catfly.com/post/32-his…

There are many more places that this photo shows up, but you get the idea. Almost all of those are wrong. They are examples of a photo being used for the wrong purpose. Examples of people who are not doing their own original work and not using their own original images. And people who are not doing proper research.

But wait. No. The photo in question has absolutely nothing to do with glue, crazy/Krazy or otherwise, nor construction hardhats and nothing to do with a helmet for either football or rugby. So let’s look further to find the facts. Please, take a moment to step into the Wayback Machine…

This photo is, in fact, a piece of aviation history. We find our way back to the origin of the image.
Here it is. This is the cover page of FLIGHT, a weekly publication from the UK.
https://www.flightglobal.com/p…

This is, in fact, a photo of a certain Mr. W. T. Warren wearing an aviation helmet that he invented. There is no glue involved, no football, no rugby. Mr. Warren is running headlong into the side of a hangar to demonstrate how the helmet will help aviators to protect their heads. It’s about aviation!

The spectators are identified as Mssrs. Lewis Turner, W. H. Ewen, and A. M. Ramsey. The article was published April 6, 1912, and can be read here: https://www.flightglobal.com/p…

So next time you decide to be a troll, please do your research, get your facts straight. Oh, and perhaps your time would be better spent writing your own original article or idea rather than trying to discount the work of others.

Garden gnomes are good; internet trolls are bad.

Posted on Leave a comment

Prickly Seed Pods

One year I removed some dry, prickly Leonotis nepetifolia seed pods – with my bare hands. Ouch!

Having learned from my mistake, the following year I harvested the prickly seed pods and attempted to remove the seeds while wearing gloves. Alas, I was not destined to be a brain surgeon and was all thumbs. I needed a better idea.

Rather than tell you my idea, let me show you in pictures. Follow along.

Thumb of 2013-12-03/greene/b90d4dThumb of 2013-12-03/greene/d61e4bThumb of 2013-12-03/greene/7e75a8;

Plastic (not glass!) container and a few small, heavy items. Mix well and shake.

Thumb of 2013-12-03/greene/c5e1ab;Thumb of 2013-12-03/greene/9022f4;Thumb of 2013-12-03/greene/61310d;

Seems that my camera has an ‘Anti-Shake’ mode, so no photo. Here, how’s this?

Thumb of 2013-12-03/greene/4e16c6;Thumb of 2013-12-03/greene/2936c0;Thumb of 2013-12-03/greene/db8172
That’s it! Your seeds can now continue drying and soon will be ready to share, trade, or plant. This also works for many other types of seed pods, prickly or not. So get shaking!!

Originally published 2013

VisitThe National Gardening Association http://garden.org (formerly All Things Plants) to learn more about Leonotis nepetifolia.https://garden.org/plants/view/112255/Lions-Ear-Leonotis-nepetifolia/

;


Posted on Leave a comment

You say Forsythe; I say Forsyth

A few years ago I learned about a ‘new-to-me’ method for propagating plants – it was called the ‘Forsythe Pot’. The Forsythe Pot method is a way to propagate plant cuttings. Someone named ‘zuzu’s petals’ posted a helpful tutorial on PlantSwap.net..

Instantly, I needed to learn more. Researching, I found a Forsythe Pot tutorial that goes a bit beyond the usual stem cutting that most people know. There’s a very good blog post with lots of information. Check out the Garden Geeks blog.
http://www.thegardengeeks.net

After doing a bit more research I assembled the supplies to make my first Forsythe Pot. It was a success! I made several more and now have a way to root as many cuttings as I care to. Sharing plants with friends is fun and easy. Since learning this method I have been giving away as many as 300 plants each year.

Curious to know how many plants I could propagate by this method, I purchased a single plant for $3.50 and began taking cuttings. From a single small pot containing one Alternanthera plant, I was able to propagate 99 new plants. Here you see the Forsythe pot on the right and the cuttings that rooted in only 17 days. Some plants root more easily than others!

And here are more clones of the single plant ready to share with friends. One new and unexpected thing I learned during this experiment is that adding limestone and changing the exposure to sunlight can have an effect on the coloring of the foliage.

After gaining some confidence I wanted to share my knowledge with others. To my mind, I believed there was one small change which could be a big improvement for those who keep their Forsythe Pots outside where the nasty mosquitoes are looking for water. Writing as ‘greene’ this was my first article about a Forsythe Pot.

Like most other folks who share information on the internet, I have been calling this a Forsythe Pot. But I was curious why I could not find a link which indicated where the name ‘Forsythe’ came from and why it was spelled ‘Forsythe’. Was it named for a university? town? garden club? person?

It took me a while, a very long while, but I finally tracked down the answer. Had to use a time machine and go all the way back. Drat, I just missed the opportunity to use the Way-Back Machine, didn’t I? Let’s go all the way back to 1835.

Oh, here it is. June 1835. Andrew Forsyth submitted an article to the magazine. See, there is no ‘e‘ in his surname! Mr Alexander Forsyth, from Oakhill Gardens, explained his ‘new’ propagation method in an article submitted to a gardening magazine. Searching further, I finally found the article on Google Books: ‘The Gardens Magazine’, later named ‘The Gardner’s Magazine, by J C Loudon. It is now a free e-book; Mr Forsyth’s June 8, 1835, article is on pages 562-564. In the article, Mr Forsyth gives detailed instructions, includes drawings of his method of propagating cuttings; also includes an explanation of how he sieves, grades and cleans the sand he uses to fill the pot.

But why is the name spelled as ‘Forsythe’ in so many places on the internet? Perhaps many people have been influenced by the Forsythe Saga on television. Or could this have been a typographical error in 1835? No, I see that his name appears on other issues of the magazine and always spelled as Forsyth. So, with your kind permission, from now on I will use the spelling Forsyth when I refer to this method of plant propagation.

Why not give the Forsyth Method of plant propagation a try? Don’t overthink. Get out there and propagate something!  Just do your own thing, take photos and keep notes, share your experiences. Eventually, it will come together – and with any skill, it won’t take 178 years!

Posted on 1 Comment

Not quite organic way to kill Virginia Creeper

Over on The National Gardening Association (garden.org) a query was posted in the Ask A Question Forum.
What is an organic way to get rid of Virginia Creeper?
The question received many excellent replies; one suggestion involved pouring herbicide into a trash can and stuffing the vines into the can – the purpose of that method was to contain the herbicide and reduce the risk of damage to desirable plants.

The question and responses set my mind to thinking. Could be another way? Not organic, but some method that uses the least amount of herbicide.

I tried surfing the internet looking at weeds and how to eliminate them, I came upon several products which looked interesting but were very expensive – using the expensive tool one would inject herbicide into the target plant. Not only was the tool expensive but one would need to purchase different formula herbicide depending on which plant was being targeted.

This one is what started me thinking… how to beat the price of $250 plus the cost of herbicide.
https://www.jkinjectiontools.c…

Since I like to design and construct things so I have my own tools. I set to work to see if I could kill Virginia Creeper using only items I had on hand.

I would target the large Virginia Creeper which has been growing up into an oak tree.
Here is a photo of the oak tree. As you can see it is a very large oak tree with a huge Virginia Creeper growing from the ground to high up in the branches. You can also see the dead Poison Ivy which is dead/dying…whew, painting herbicide on individual leaves is a lot of work!
Thumb of 2016-09-03/greene/22f0d2 Thumb of 2016-09-03/greene/57e655

Rather than paint individual leaves, here is the process I tried.
Drill a whole not quite to the center of the stem of the vine. Using my battery powered drill driver with 1/4″ bit I made 3 holes along the vine. For smaller stems/branches use a smaller drill bit, or even a syringe if you have one. Keep in mind that you will be pouring liquid into the hole so try to aim for something perpendicular to the horizon to avoid having herbicide spill out onto desirable plantings

Using a paper funnel to direct the flow, measure a very small amount (1/4 teaspoon) into each hole. A disposable paper funnel would be useful to avoid wasting or spilling the herbicide. You can get these funnels at most auto parts stores near the oil or just roll a piece of paper into a funnel shape – junk mail works.

After pouring the herbicide into the hole(s) use a bolt, screw, cork, or short piece of stick to plug the hole – just something to keep the rain out and the herbicide in.

Thumb of 2016-09-03/greene/a90d30 Thumb of 2016-09-03/greene/8b3632 Thumb of 2016-09-27/greene/2d2b64 Thumb of 2016-09-03/greene/79f917

And then wait…put your feet up; take a walk, watch a movie…this might take a while. Be prepared to wait for several weeks as some herbicides can take anywhere from one to 4 weeks to take effect; some can take as long as 8 weeks.

Two days, let me repeat that…two days after starting this experiment I was walking my dogs in the backyard when I made an observation. There were lots of green leaves scattered all over the ground under the big oak tree. For a moment my heart skipped a beat but thankfully these were not oak leaves. Looking more closely it was evident that they were all Virginia Creeper leaves. Huh? Is the experiment working? So fast? Is that possible?!

I walked over to the low hanging Virginia Creeper that is loaded with seeds – this particular piece of the plant always smacks me in the face while I am mowing the lawn. I will not be sad to see it disappear.

Thumb of 2016-09-03/greene/dcf0c5

Here is a view from inside the house through the window screen on day 4. You can see that the leaves are disappearing quickly.
Thumb of 2016-09-27/greene/6335ec

Here is a beautiful sight – dead Virginia Creeper!
Thumb of 2016-09-27/greene/ec6e01 Thumb of 2016-09-27/greene/6fe82b

Sure, I know there are expensive and sophisticated systems that are available that will accomplish the same thing, but this was an experiment to see what I could accomplish by spending no additional money – just using things I had on hand. Hope you like my method and will try it on a Virginia Creeper in your neck of the woods.

Is this an organic way to eliminate Virginia Creeper? Heck no! But it uses the least amount of herbicide and limits the possibility for harming desirable plants and it’s much easier than going out on a limb to paint individual leaves.

Note:
If using this method to eliminate Poison Ivy please wear long sleeves and disposable gloves and be prepared to clean all tools to remove the toxic oils.

Posted on Leave a comment

Guerrilla gardening

No, it is not a garden created and maintained by Gorillas!

Look at the spelling…Guerrilla. As far as I know, the first person to use the term ‘Guerrilla Gardening’ was Liz Christy in 1973 as she and her Green Guerrilla Group were active in New York in the area known as Bowery Houston.

Okay, let’s clear up something, especially for folks who live in Texas or students learning about the history of the US of A. Sam Houston was a great man in the history of Texas. HIs name is pronounced /ˈhjuːstɨn/, [ˈhj̊uːstɨn], [j̊uːstɨn]hyooh -stuhn, HYOO-sten.

The area in New York where Liz Christy was busy doing Green Guerrilla Gardening is pronounced /ˈhaʊstən/ HOW-stən as the street was named in honor of William Houstoun. William Houstoun was born in Savannah, Georgia around 1755 when Georgia was still part of the British Empire. He was a British citizen from birth until 1776; after which he was an American citizen until his death in 1813. He relocated to New York where he married May Bayard. He was a planter, lawyer and statesman who divided his time between Savannah and New York. And yes, I realize all the Houston street signs in New York are spelled wrong but, as we say in the South, “We don’t care how you do things in New York!”

Okay, let’s get some guerrilla gardening accomplished.

But wait. First, let’s talk about Masanobu Fukuoka and some of the books he has written that have been translated into English:

The One-Straw Revolution: An Introduction to Natural Farming (1978);
The Natural Way of Farming; The Theory and Practice of Green Philosophy (1985);
The Road Back to Nature: Regaining the Paradise Lost (1987);
Sowing Seeds in the Desert: Natural Farming, Global Restoration, and Ultimate Food Security

Masanobu  Fukuoka did not invent the seed ball, seed bomb, seed dumpling, green grenade, but he did reinvent and introduce the method to millions.

Links to information:
http://www.ifoam.bio/en/masano…
https://www.linkedin.com/pulse…
http://freedomgardens.org/2010…
http://www.seedballs.us/
https://seed-balls.com/new-gue…

Also look at:
The Seedpill Project
Subversive Gardener

**************
Moss graffiti:
Gather moss in a responsible manner; remove as much soil as possible. Break the moss into small, manageable piece, place into a blender.
Add the following:
2 cups buttermilk (or yogurt)
1/2 teaspoon sugar
2 cups water (or beer)

Apply ‘moss paint’ onto a wall or fence. Mist the moss once every 2 days. If there is rain, do not mist. Reapply moss paint on the days when you do not mist and when it is not raining.
When you no longer wish the moss graffiti, scrape away as much as possible, then spray the area with lime juice to kill any remaining moss.
***************

Guerrilla gardening is not always legal, so please, do not break the law. Do your own version of guerrilla gardening on land that you own or have received permission. If you have an area in your yard that could use a bit of color, toss some green grenades/seed bombs and walk away. Come back in a few weeks to see if your efforts have been successful.