Posted on 1 Comment

When there are trolls in the Garden, it’s time to leave.

Here is an excellent example of why I am no longer making public posts over on my old favorite plant/gardening site.

I had been in the process of writing an article for NGA. The article was not yet finished but I posted a bit of information and a few images to help folks who inquired how to decrease the population of biting flies.

Here is my original post:
https://garden.org/thread/view…

Someone who trolls the internet attempting to make others look ignorant quoted my idea and then, attempting to discredit my original idea, posted a photo they found on the internet claiming the photo showed a man in a football helmet stuck with glue to the side of a building which is, of course, incorrect information. The poster also judges incorrectly thinking the image is from the 1950’s. Find the post here (and, by the way, the person has already edited the post once and could edit it again):
https://garden.org/thread/view…

I believe the poster was referring to the old television ads for Krazy Glue. This is the commercial, which, by the way, shows a man not in a football helmet, but in a construction hardhat – not the same thing at all:
https://videosift.com/video/Kr…

If the troll had bothered to research the photo a bit more they could have learned that this same image has been used in many places on the internet. And almost all are wrong. The result of insufficient research.

In one place on the internet, the photo was used to show a man supposedly wearing a football helmet running headlong into the side of a building to prove the helmet protects the head. Nope, not correct.
https://www.historyinorbit.com…

The image has also been used here claiming to show a rugby helmet being tested in 1912 (again, that is incorrect but at least they got the date right):
http://amorq.com/article/4918/…

And here again (see photo #19 and again, it is incorrect – not a rugby helmet):
https://catfly.com/post/32-his…

There are many more places that this photo shows up, but you get the idea. Almost all of those are wrong. They are examples of a photo being used for the wrong purpose. Examples of people who are not doing their own original work and not using their own original images. And people who are not doing proper research.

But wait. No. The photo in question has absolutely nothing to do with glue, crazy/Krazy or otherwise, nor construction hardhats and nothing to do with a helmet for either football or rugby. So let’s look further to find the facts. Please, take a moment to step into the Wayback Machine…

This photo is, in fact, a piece of aviation history. We find our way back to the origin of the image.
Here it is. This is the cover page of FLIGHT, a weekly publication from the UK.
https://www.flightglobal.com/p…

This is, in fact, a photo of a certain Mr. W. T. Warren wearing an aviation helmet that he invented. There is no glue involved, no football, no rugby. Mr. Warren is running headlong into the side of a hangar to demonstrate how the helmet will help aviators to protect their heads. It’s about aviation!

The spectators are identified as Mssrs. Lewis Turner, W. H. Ewen, and A. M. Ramsey. The article was published April 6, 1912, and can be read here: https://www.flightglobal.com/p…

So next time you decide to be a troll, please do your research, get your facts straight. Oh, and perhaps your time would be better spent writing your own original article or idea rather than trying to discount the work of others.

Garden gnomes are good; internet trolls are bad.

Posted on Leave a comment

From a Hutch to a Coop-ette!

Absolutely love to repurpose, recycle, upcycle. Also, like to adopt animals that are looking for a new home. Well, okay, the animals have no say in the matter. People, for whatever reason, decide they can no longer keep an animal and, well, there you are. Or I should say, there I am!!

Someone was looking to rehome their rabbit. The rabbit is named Twitch and came with his own hutch. How cool is that? And the best part is that the whole deal was only $40. But no. It gets better.

The person rehoming this adorable bundle of fur is a magician! Twitch had grown too large to fit into the hat for the magic show so, well, there you go. (The above image was taken when Twitch was still tiny.) Yippee, I have a magical rabbit!!!

When I picked up the rabbit and the hutch I fully expected to plop the hutch down, put the rabbit into the hutch. toss in some food and water and enjoy my magical rabbit. Easy peasy; done and done, right?

But no. When I saw the hutch my brain went into high gear. Creativity kicked in.

What if…do you think it would be possible? Hmmm. Let me think a minute. If I raise up the hutch and put a lower floor, reinforced with fence wire and 1/2 inch hardware cloth…I’ll be right back.

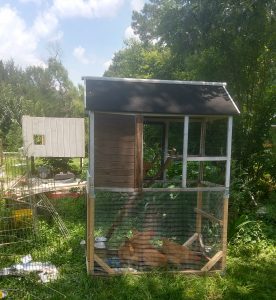
Yep, it works. The rabbit is now happily living in a dog pen inside the house and my 6 chickens have a 2-story mini coop with a large-ish outdoor play area that had a former life as a dog exercise pen. I am calling it a ‘coop-ette’, hope I invented a new word.

Look here to see the before picture of the original coop:

https://www.wayfair.com/pet/pdx/innovation-pet-cotton-tails-bunny-hutch-inpe1022.html

Sorry, this item is no longer in stock so don’t be trying to buy one and make your own two-story coop-ette.

You may still be able to purchase on here: https://www.ebay.com/itm/142571391320

But if you plan to use this for rabbits, please know that it is made mainly of wood. Rabbits tend to chew wood. Eventually, the rabbits could chew their way out, hit the ground and end up on a different blog post. It’s better to use it as a coop-ette for chickens.

And here is the after picture: 

If you live near Savannah, Georgia and need a very entertaining magician, here is a link to some reviews for Tembers Tales, the magician who provided the hutch and the magical rabbit. Children absolutely love Miss September.

https://www.temberstales.com/

https://www.temberstales.com/reviews


Posted on 1 Comment

Another Day; Another Adventure.

September 11, 2018

So here I am, leisurely cleaning elderberries so I can make some elderberry/fig something-or-other. I already have the figs cooking on low heat. Then I hear a dog bark. Not one of my dogs but I recognize the bark. It the bark of El Gato who lives across the street. You may remember him as the dog that had a bone stuck in his throat. I also hear another dog, or maybe two more dogs. This is worrisome so I set the bowl down and walk across the street to investigate. It’s not nosiness; it’s being neighborly.

I see the young lady of the house putting the little dog into his enclosure but I can still hear barking. Letting myself into the gate, I wave. Then I see two…no, there are three dogs in the next yard over and they are furiously barking at something near a tree. Don’t worry; there is a fence separating the two yards.

The young lady and I decide the dogs may be barking at a lizard or possibly a snake so we keep our distance. The dogs continue to focus on one spot and will not quit barking. We wait.

One of the dogs, the white one with a pink collar, turns and barks at her owner’s house hoping to get some attention. The black dog lies down and stares at the spot near the tree. The fluffy dog continues to bark for no reason because that’s just what fluffy dog do.

Ah, the owner of the three dogs is approaching. Over the cacophany, we introduce ourselves and chat for a while. After explaining that it might be a snake she takes a look from the safety of her side of the fence. Her face lights up. It’s a chicken! The poor chicken is hiding the best it can and has no intention of coming out as long as the dogs are barking. Whew, since it’s not a snake, I step around the tree, hunker down and grab hold of the chicken. The dogs are quite satisfied that they have done a good job.

Accompanied by the young woman of the house, I carry the chicken safely tucked under my arm and return it to the coop. No chickens, dogs, lizards, snakes, or people were harmed during this incident. Another day; another adventure. What will tomorrow bring? Oops, I almost forgot that I’m cooking figs and need to add the elderberries. Plus I need to search the internet for a recipe. See ya later.

Posted on Leave a comment

My day so far (includes chickens).

March 3, 2018
Here is my day so far.

The big dog Allie woke me up about 1:30 am with here super loud licking noises (she has very clean feet). Instead of giving her a gentle kick, which is what I should have done, I used my voice and said, “Stop it, Allie!” Well, that was the cue for the baby chicks in the plant room to start cheeping…since they knew I was awake. Sigh.

I checked on the chicks and they had made a mess with their water and their bedding was wet. It’s not good to have wet, chilly chickens, so there I was cleaning the container at some strange hour in the morning. After that, I could not get back to sleep. Of course, the big dog Allie and her clean feet had no trouble getting back into slumber-land.

Note: I purchased the 6 Buff Orpingtons on February 24, 2018. They were approximately 2-3 days old at that time.

One of the chicks, the one I named Dottie, is not doing well. It is called ‘failure to thrive’. She is less active and growing much more slowly. She’s a runt…or maybe she will be a rooster and (I think) they tend to grow more slowly. What the heck, I was awake anyway, so I did some research. Lots of stuff I could buy but not between 2 and 3 in the morning, so I went with Plan D which is honey in water. I managed to get Dottie to take some and will continue with that until I can get to a store later today. I also looked into waterers for chicks/chickens and figured out which ones to buy.
(Not my image; I found it here: http://naturalchickenkeeping.b…🙂
Thumb of 2018-03-02/greene/2b3bb9

With the chicken research accomplished, I took a short nap and woke at 9:30 am. Allie stayed in the nice warm bed. Shared a small can of BeanieWeanie with two of the dogs and only spilled a little on my pants. Just as I was scraping the last bean out of the can Allie woke up and came running to get some. I tried to get enthused to do some yard work. Hoping to cut some grass, I walked out into the front yard to check on the dew situation. My across-the-street called me to come over. She seemed excited like there was some big news. No, not news. She had a tiny problem.

You are gonna love this one…

Seems their little dog was in the yard playing with the adult son, José, and the dog started acting weird. José called for his mama to help…then together they waited for me…because they think I am the dog expert.

They showed me the problem. It was one of those…”Why do I have to be an adult right now?” moments. There was a piece of bone stuck in the dog’s throat. I said it was a tiny problem because the dog is tiny, the dog’s throat is tiny, but I could not get my fat fingers in there to pull that big piece of bone out. I was afraid it would get shoved back too far and…well. You know.

Not knowing what kind of tools or utensils they had on hand, I used my best sign language to make a pinching and pulling motion. Mama sent José into the house. While we waited for José I instructed Mama to hold the dog upside down and pat it on the back – I held the back legs up and she held the head down and together we patted the dog’s back.

José came back with needle-nose pliers. Together the two of them held the dog still and held the jaws opened. It was my lucky task to pull out the bone. No luck. I did manage to loosen the bone…so quickly I grabbed the dog’s back legs and held them up and Mama pulled the dog’s head down – good thing we had practiced this maneuver! I started to pat the dog on the back but José said, “No!” The bone fell out onto the grass.

They were ever so grateful. But the most grateful was the dog. Oh, by the way, the dog’s name is Gato…which means ‘cat’. Pretty funny. Anyway, Gato was hugging me and kissing me and was really appreciative doing the whole butt waggle thing and all. Made me feel pretty good.

After the excitement was over, I managed to cut grass/weeds for about 30 minutes. I am now taking a well-deserved rest.

Update 10 pm – same day.
I could not stop thinking about the little chick named Dottie. There is very little I can do for her but I have to at least try. I did more research and made a decision. Loaded the dogs into the car and drove (through horrible rush-hour traffic to the Tractor Supply store in Rincon, Georgia. I looked to see what, if any, chicks they had available. My hope was to find more Buff Orpingtons, but no, none of those today. I made the best choice of the available breed and selected one called Production Red (not a very imaginative name). They are a cross between Cackle Hatchery’s Rhode Island Red and their New Hampshire chicken.

Instead of one brooder I now have a duplex brooder (these are both inside the grow tent). One brooder for the 5 larger chicks and one for the new 4 chicks and poor little Dottie. I am hoping that being with chicks her own size will give her a fighting chance to survive, thrive and grow. To create the duplex it was necessary to buy another feeder, waterer and a heat lamp bulb. I also bought some Nutri-Drench (add to their drinking water) to help all the chicks. Maybe tomorrow I will take photos, but golly, it’s been a really long day and I am tired.

I never did have that coffee.
——–
Update March 9, 2018
Dottie continues to make progress. She is still a bit smaller than her new Production Red sisters but she is standing upright, eating good, no pasty butt, and…WooHoo!! is beginning to grow tail feathers! (Doesn’t take much to make me happy.)

For the original 5 Buff Orpingtons, the larger chicks, I installed the new watering cup and am helping them to learn to drink from it. During the day I just keep checking on things but for the night I put their old waterer in the brooder. Can’t have dehydrated chicks!

Update March 12, 2018
The chicks are doing well. Dottie continues to be smaller than the others. Here are some photos from today. One of the larger chicks escaped but did not get far.
Thumb of 2018-03-12/greene/79fe4e
Another of the larger chicks decided to try perching on the side of the brooder.
Thumb of 2018-03-12/greene/9ae9b6
The larger chicks are looking good.
Thumb of 2018-03-12/greene/5c27c0
The smaller chicks are doing well; Dottie is in the corner. She is still quite small.
Thumb of 2018-03-12/greene/e21169

I have to dog-sit the little Chihuahua for two more days – Tuesday and Wednesday. After that, I can use the floor space to make a larger brood area for the chicks. Here are a few pictures of Chico. He is an excellent lap dog. 
__________
Update: March 15, 2018

Chico, the little Chihuahua is home with his family. Today I went to Animal Services and bought Chico a dog tag; he is a totally legal dog now. The Humane Society shares the same parking area so I stopped in and bought an identification tag for Chico. I had them put the name Chico plus the owner’s phone number on one side of the tag and on the back of the tag, I had them put two more phone numbers, one of them is my own. That way, if the dog should get lost, one of us should be able to answer the phone and bring Chico home. In about 2 weeks the dog across the street has an appointment to get all his shots and will be neutered. I am gonna conquer the dog problem one dog at a time and am making friends at the same time.

The ten chicks were outgrowing their brooders. Well, all except for Dottie who refuses to grow. Just a note here; many years ago I read a book and it became one of my favorites. It was written by Gunter Grass and is titled “The Tin Drum”. The main character is Oscar. He is a boy that refused to grow; it’s not that he could not grow, he just refused to do so. I believe Oscar and Dottie have something in common.

Over on a Facebook homesteading group, I learned about a way I could keep the chicks confined indoors until they are old enough to go outside. It involves a kid’s wading pool, plus a dog exercise pen. I happened to have both items so all it took was some effort to clear a space in the plant room…it took me two and a half days of hard work and a lot of pain but I got it done. Have a few adjustments to make for the waterers and feeders but so far so good. Plus…my dogs like to visit the chicks.
Thumb of 2018-03-16/greene/8b6be6 Thumb of 2018-03-16/greene/6db871

Something good happened. I came home to find two packages on my front steps. I thought they were things I had ordered for the chickens, but no. They were something else. I contacted the company and reminded them that, although I had intended to order from them, I had not actually finalized the order nor had I paid for it. No problem, they told me that, since I had informed them that there was a glitch in their shopping cart/ordering system, they decided to send me the items for free. I am amazed. The order was worth more than $100. Wow! Certainly needed to sit down after that one!

Gonna rest now. Maybe sleep a bit. Getting old is difficult; being in constant pain does not help much. Thinking back on the situation that caused me to be upset, I decided it’s not worth dying just to make other people happy. If someone or more than one someone is acting like a troll, I will not let them bother me. I’m gonna go talk to my dogs now. The dogs give me unconditional love.
———-
Update March 17, 2018
Some kind person in the Backyard Chicken Forum advised me to add raw egg and fish to Dottie’s diet in addition to the Nutri-Drench. Dottie is doing much better. She seems stronger. Is walking better. Her feathers are beginning to grow. Here she is:
Thumb of 2018-03-18/greene/301a56
———-
Update March 18, 2018
After taking care of the dogs I checked on the chicks. Oops, I have no more food for them!! So instead of relaxing, I had to pile all 3 dogs into the car and drive over 30 miles to buy chicken food at Tractor Supply – the only store opened and selling chicken food on a Sunday.

Arriving home it took all my strength to hoist that 50-pound bag out of the car and onto the front porch. I slit open the bag and scooped the food into convenient, easy to handle plastic canister…like this:
Thumb of 2018-03-18/greene/969fdd

Headed into the plant room which is also the chicken room, I fed the chicks then looked for another plastic canister. Ah, there’s one, on the floor. And…dang…it is full of chicken food. I did not know that I already had chicken food and I just drove a round trip of over 70 miles to buy food. Getting old is very interesting, but sometimes a bit expensive and time-consuming. Feel free to laugh with me at my mistake.

Anyway, while I was at Tractor Supply I talked to the young man who helped me buy the chicks and told him about the runt named Dottie. He said it’s possible that she may be a Bantam; he said sometimes the chicks get mixed up. I will now do some research to learn about Bantams.
———-
Update: March 22, 2018
I made a post over on the Backyard Chicken Forum but it fits here.

Pycoppe is a surname from Lancashire, England. Meaning: “hill with a peak or sharp point”. Alternate spellings: Piccop, Picopp, Peacop, Pickhup, and Pickup. I will apologize to anyone who has this surname; I mean no offense.

Way back when I was 21, working with 18 other silly young women at a bank filing the canceled checks, we would sometimes call out the names on checks to keep things interesting. One name that crossed my desk was Pamela Pickup and we all had a good laugh. At that time I did not know the history of the name, hence the apology now.

Why am I saying this? Out of the 10 chicks in the brooder, only one has thus far earned a name and that is Dottie, the runt – she is named Dottie because I had put a dot on her head to better monitor her progress. But today, several times today, one large chick stepped forward and allowed me to tickle her chin, stroke her head and to pick her up…so I am naming her Pamela (after Pamela Pickup). Hopefully, the other 8 will earn a name soon. I never realized how difficult it is to name chickens when there are no rug rats, toddlers, or preschoolers in the home! Kids can invent the best names!

I’m gonna have to learn something about leg bands to tell the chicks apart.
Is it okay to use the tiny hair elastics? Or is something more professional required?
__________
Update: Mar 23, 2018
Leg band research.

Since I have 10 little chicks I want to put leg bands so I can tell them apart as they grow.

Looking online at chicken leg bands I found several choices. One of them looks just like the cheap plastic spiral knitting markers I purchased several years ago. Heading down the research rabbit hole I searched for knitting markers.

Oh, my!! I want to go back and live my life over again and create artistic knitting markers! I was blown away by the imaginative designs that are available. One looks like something I would have made back in the day when I was working with silver jewelry. Can I have a life do-over?!!

https://www.etsy.com/listing/4…

Life is interesting with chickens. I decided to buy these leg bands.

https://happyhentreats.com/products/ez-leg-bands-small?variant=39690450189
________
Update, April 1-3, 2018:

The chickens are quickly outgrowing their indoor brooding area. This chick has discovered the window and is looking forward to being outside. Um, yes, I realize there is no interior trim on the window. Please remember that I am living in a not-quite-finished house. Hopefully, I’ll get around to the inside carpentry when winter arrives.
Thumb of 2018-04-04/greene/2ffeeb
Even the little runt named Dottie is growing; no image today but I’ll bet one soon.

As Y’all know I like to pick up stuff at the roadside for free when folks discard things. Free is good. The word I need to use now is serendipity. Almost a year ago I stopped to ask permission to pick up some lumber. The man had dismantled a set of bunk beds and was only too happy to have me take the wood. About 6 weeks ago I stopped at my friend Will’s house and picked up something that was almost too heavy for me to put into my small car. It was a framework of 2 x 4s with some plywood on top. I have no idea what the original purpose was but I hauled it home.

So here I am trying to design a chicken coop. It will be raised up about 24 inches from the ground and will have an attached run. I now have only the original 6 Buff Orpington chickens. The 4  Production Red chickens were given to a man I met in Home Depot. He wanted the 4 chickens to give to his dad who had recently lost his chickens to a roaming dog. Now that there are only 6 chickens helps enormously as designing the coop is easier now. I got out my trusty measuring device and start measuring the lumber in my yard and…can you believe it!!! The plywood platform measures 72 inches by 39. The wood from the bunk beds measures…Whoa!!…72 inches. Serendipity!! If I had to buy a sheet of plywood it would have cost between $25-$38. Yikes. Roadside shopping sure saves money! Here is the floor after cleaning.
Thumb of 2018-04-24/greene/02d4b9

For the time being, the coop will be 72 x 39. The chicks are not yet full grown so the space will be adequate. Yes, that’s slightly on the small side for full-grown Buff Orpingtons, but I will do a makeover and add a nesting box and make an addition on the opposite side to extend the floor space about 2 feet.

Okay, that takes care of measuring, planning, and designing. Now I gotta make room for the coop and run. Time to get down and dirty in the garden. First I have to move about 150+ plants…It took me the best part of three days to move all these plants. Some needed to be divided and repotted, watered and all that. I still have to add labels to the plants that are headed to the swap.
Thumb of 2018-04-04/greene/ca20af

Then I had to figure out how to lift up a huge wooden raised bed frame. This frame was originally for the raspberry bed but that bed got taken over by goldenrod while we worked on fixing the house. The next thing the frame was used for was to corral the many plants that were moved from my old garden to this new property. Now that the plants are out, the frame is out…I don’t yet know what it will be used for, but it will definitely be used for something. This frame was really heavy. I could barely move it. I pushed, pulled, dragged, cursed and managed to get it out of the way of the area for the coop and run.

Thumb of 2018-04-04/greene/71ff57

I dragged one of the 14-foot long 2 x 10s (a gift from a neighbor who works construction) into place just to get an idea of how much more space I needed to clear. Ugh. Quite a bit more. Here are the before and after images…
Thumb of 2018-04-04/greene/2a4cfe Thumb of 2018-04-04/greene/2d0288
Right smack in the middle of that spot is what’s left of the Celeste Fig tree. It was not a good producer so it had to go. I won’t bother to remove the tree stump as it will be under the coop area.

That’s as far as I got so far. Gotta eat more protein and build some muscle to get this job done. Sheesh, all this for a few free eggs. Is it worth it?
_______

Update: April 24, 2018

Whew, the past couple of weeks have been…not good. Younger daughter made the difficult decision to have the big dog put down (cancer, arthritis, pain, etc.), then I got sick (sicker than normal) for over a week, plus had to keep the neighbor’s dog in my house after surgery…no time or energy to build the coop. Daughter arrived for a visit. After she left I had a good scare when my car tire blew out.
Thumb of 2018-04-24/greene/c14606

I gathered some strength and got back to work. Went to Lowe’s and purchased VCT squares and glue for the floor of the coop. Ran out of glue. Ugh! Bought more glue and finished the tile. Not the best job but at least the coop floor will be a bit easier to keep clean. Sorry about the shade but here is what the tile looked like after I cut and laid it all out, and a photo of what I finished before I ran out of glue.
Thumb of 2018-04-24/greene/7dfd5f Thumb of 2018-04-24/greene/09f907

Hauled the extremely heavy 14-foot long 2 x 4s into place. Cut two 2 x 4s 72 inches long. Screwed them together to make the base frame of the coop and run.
Thumb of 2018-04-24/greene/49e0c2

The weather did not cooperate. Thunderstorms and extremely heavy rain most of one day. Over four inches of rain fell. Soggy ground; not good for working outside but I ran between the raindrops, made some measurements and spent some time indoors drawing the design. During a break in the storm I cut some 2 x 4s, screwed them into place, then carefully (so as not to damage the floor or hurt myself) I hauled the floor to the back and somehow miraculously hefted it up onto the four uprights. This is not the normal way to build a coop but it was all I could figure to do to make use of the free floor. Then, of course, more rain happened, so I covered the floor with a tarp and ran into the house. The floor is somewhat warped but that won’t bother the chickens.
Thumb of 2018-04-24/greene/8d95ee Thumb of 2018-04-24/greene/018086

Update: April 25, 2018
Today I began assembling the first wall section. Cutting braces for the corners is always tricky when a person has dyslexia but… Hurray! Hurray! Hurray! No mistakes!!!

After putting the first section together I measured it to see if it was square. Not quite. So I took one corner apart and fixed that. All square now. That’s enough work for a while. If I get another burst of energy I’ll tackle the next section, either later today or tomorrow, weather permitting
Thumb of 2018-04-25/greene/f1862a Thumb of 2018-04-25/greene/86545b Thumb of 2018-04-25/greene/436660

While I worked the dogs, George and Jack were snacking on the swamp sunflower leaves.
Thumb of 2018-04-25/greene/664129

And some good news! I’ve been trying to kill a plant for two years. Today it made a flower. It’s Comfrey!
Thumb of 2018-04-25/greene/93007f

Update: Apr 27, 2018
Yesterday no work got done on the coop. I had a low energy day so I went to Home Depot to buy some more 2 x 4s. Most of the coop is reclaimed wood but for the inside, I wanted new wood. I selected 6 very nice, straight pieces, loaded them onto a cart, left the cart and went to get a box of screws. When I got back an overenthusiastic employee had put the lumber back on the pile. No worries. She knows me and apologized. She remembered where each piece of lumber was and loaded them, gave me a nice discount, and found a handy helper to load the wood into my car. On the way home I ran a few errands and it was a good day.

Got up early this morning to work on the coop; the weather was perfect T-shirt weather. Measured and cut the wood (had to do it twice as I wrote the wrong measurement the first time), drilled holes and screwed the second wall together. Added corner braces. Everything is square. Here are the two long walls framed and ready to go. Halfway through the work, some evangelists stopped by. I gotta admire their spunk. Just because of my surname, they assume that I can speak Russian. (Greene is not my real surname; my surname is Czechoslovakian.) Nope, I can’t speak Russian, nor was my late husband Russian, but I do have a friend named Mark who wrote am academic Russian dictionary. I told this to the evangelists but they were not interested. They left me a card.
(This is what Mark worked on: http://www.academia.edu/425345…)

Thumb of 2018-04-28/greene/bc3ac9

At this point, I had to stop myself. Since it will be necessary to add some kind of wire barrier under the coop and run to prevent predators from digging up and in from the bottom, it would be wise to not add any more weight just yet. Okay, now to find some wire…Um, where did I put…? You know how I am forever picking up stuff at the roadside, right? Well, last night I was thinking of how to avoid spending money to buy wire fence material and it dawned on me. I had picked up a roll of chain link fence fabric. I located the roll of fence material but there was a slight problem. During one of the hurricanes, a dead tree belonging to the neighbor decided to fall in my yard. The fence material was under the dead tree, and the dead tree was covered with a Wisteria vine. Lovely. Well, yes Wisteria is lovely but I was using the word sarcastically just now. Time to drag out the electric chainsaw. the super long extension cord…ho, hum…start hacking away. Whew. After a few Lou Ferrigno moves (not very ladylike squats plus some grunting sound effects) I cut the dead tree into pieces, and lifted it high in the air and tossed each piece a whole 3 feet away.

Okay, the fence material is finally free…twice! It measures four feet wide. Now to measure how long it is. Looks good. A little longer than I need. Perfect. So, drag it 100 feet, lay it inside the wooden frame and…oops, needs to be 6 feet wide. Oh, well. Start looking around the yard and, ah, perfect. Folks who think they want that plastic coated wire shelving in their closets often change their mind and toss that stuff. I pick it up. Lots of it. The hardest part was trying to figure out how to get the shelving wire under the heavy wooden frame.

I used one of these (whatever it is that I got at a yard sale for 25 cents:
Thumb of 2018-04-28/greene/6e6703
Levered up the heavy wood frame, stuck a brick under, slid the shelving under and, rinse and repeat several times. I got a bit dirty as this job required me to be up close and personal half kneeling/half laying down. But it’s in place! Tomorrow I will use some J-clips to join things together. That’s two layers of commercial grade landscape fabric under the wire to prevent unwanted weeds from popping up. Oh, and don’t worry that it’s not beautiful; it will be covered, hopefully, tomorrow or the next day that the weather cooperates.
Thumb of 2018-04-28/greene/765433

Update: April 28, 2018
Whew, started at 8;30 am, worked on the coop to secure the wire fence material. The J-clips were too small and I could not find the hog rings so I just used pliers and lots of strong-arm techniques. My grunting noises are improving.
Thumb of 2018-04-28/greene/38a1db

Then I took a rest, walked dogs, ate breakfast and all that jazz.

Update two for the day. Back out to work some more. Here is the midday view. The next carpentry will have to be done on a ladder. Wish me luck!
Thumb of 2018-04-28/greene/081950

Since the chicks are still young I will be adding the next box later. For now. I am using two of these bins for measurements to do the framing and will figure out later how to create and attach external next box.
Thumb of 2018-04-28/greene/67fb37

Whew! Third update today. It was a good day to work outside.
Okay, I attached a few more pieces of lumber, nothing exciting there. Decided to try to pull the warped area in a bit…yep, I can do this. The screws are temporary. Also, I had to tie the top to pull it together. I’ll let everything sit for the night so it can think about what it’s done. Maybe in the morning, the wood will decide to not be so warped.
Thumb of 2018-04-28/greene/020cd5 Thumb of 2018-04-28/greene/20da94

So at 6:30 pm this is the coop; how am I doing so far? Not bad for an old, disabled woman working alone, right!? Sure hope the chickens appreciate the effort. Oh, I have decided to paint the coop barn red with white trim. The wood in the run will be painted white and the access door will be red…or maybe some strange and exciting color. I still have to build the door.
Thumb of 2018-04-28/greene/a6e8c2

Update: April 30, 2018
Seems my original color scheme was all wrong. The new color will be a lovely dark teal called ‘Splashy’ with white trim. This will be the best chicken coop in the entire world.

*******
Inserting a quick hello and a great big thank you to my local Sherwin Williams store!!
*******

Update: May 1, 2018
I worked hard today not that I have much to show for my effort.

The professional paint person advised against using the cedar wood…but, since I have no money to buy another type of wood, I seem to have no choice but to use what I have. I have some fake Tri-Sodium Phosphate and I used that to scrub down all the cedar wood, front and back. Then I used some bleach…okay, yes, I know bleach should not be used on wood but I did not happen to have any oxalic acid teak wood cleaner on hand. Ran out of bleach. Ran to Walmart. What the heck, while I was there I grabbed one of the handicapped electric carts and did a quick grocery shop. Did good; only $36. I even remembered to buy the bleach. WooHoo!!

Arriving home I quickly put stuff into the frig, said hello and apologized to the dogs, went out back and finished cleaning the cedar wood. Dang, I rinsed and rinsed…this is getting tiresome…and rinsed a few more times. That’s it. I’m done.
Does this look like a whole days work?
Thumb of 2018-05-02/greene/30b43b

Oh, I forgot something. In the middle of washing and rinsing the wood, I caught some movement out of the corner of my eye. Aha, the little dog (his name is El Gato) that I took care of escaped and ran across the street to come to visit me. I quickly scooped him up and carried him home. After helping the young lady of the house to secure that dog and their other dog, I was treated to a viewing of their newly hatched chicks. Oh, so cute. I could not count them accurately but it seemed to be about 10 or 12.

When the cedar wood is dry – really dry, I will seal it will either Kilz or Zinsser…which I still have to buy. When the coop gets finished, this had better be the best dang chicken coop on the planet. Sure it taking long enough to build.

Update: May 2, 2018
What a weird day. I loaded the dogs into the car and before I could put the key into the ignition, my older daughter called to see if I was okay. Um, why? Seems that a plane fell out of the sky and she wanted to make sure it did not land on my or my house.

Checking the news – it was a C-130 Hurricane Hunter based in Puerto Rico with a crew of five. They were traveling from Puerto Rico via Savannah and then on to Arizona to the plane ‘boneyard’. Sadly, the plane crashed and all perished. The road will be closed for quite some time while they do the cleanup and investigation.

The dogs and I managed to get to Home Depot where I purchased some Kilz 2 to seal the cedar wood. It’s been a long day and this is all I have to show…same wood from yesterday but now one side and one edge have been sealed with the Kilz. Tomorrow, weather permitting, I will seal the other side and the edges.
Thumb of 2018-05-03/greene/abe8af

Update: May 5, 2018
Happy Cinco de Mayo to everyone!!!
I am invited to attend a baby shower today between noon and 4 pm. Hmm, I have a bit of time to do just a small amount of work on the chicken coop. I measured, cut, and attached some 2 x 4s to frame the pop door and get ready for the siding on one of the longs sides of the coop. It may not look like much, but I’m happy with the way it is turning out. This will all make more sense after the siding is installed.

Thumb of 2018-05-05/greene/e82c36

After supper, a short rest and walking dogs, I installed a few pieces of siding over the pop door. Here are the outside view and the view from inside the coop. I had to stop because it was getting dark and the mosquitoes were getting. The pencil marks will be painted over, no worries.
Thumb of 2018-05-06/greene/e6b911 Thumb of 2018-05-06/greene/668784

*******
Note: Writing a note to myself. Something I learned today about keeping lice and mites under control in the coop. Have not researched but I will. Clean out the coop (wear old clothing and breathing protection), sprinkle some Sevin dust in the coop and on roosts. Use LD-447Z fogger to fog the coop (closed up tight) for one hour, then let air out for one hour. To treat the chickens use Ivomec Pour-On for Cattle. About 8 drops per bird, use a dropper to apply directly to the skin along the back from neck to the tail (3-5 drop for bantams). Do this process twice a year in April and again in October. Should control lice and mites. I still need to research the amount of time to not use the eggs or meat as the information keeps changing.
*******
Update: May 6, 2018
I thought today would be a good day to work outside but it was not very pleasant. The clouds were nice but it was very humid with somewhat bad air quality due to people burning. Taking it easy I got a bit of work done. The siding that I added yesterday needed to come off and get redone. Oops. Live and learn. Took the dogs to Home Depot to buy more screws but when we got home there was no energy left. Tomorrow will be a better day. Here is the siding near the pop door viewed from the outside and from the inside of the coop.
Thumb of 2018-05-06/greene/cea627 Thumb of 2018-05-06/greene/d7e421

While the coop is being built the chickens remain in the guest room. Little Dottie made me smile when she finally learned to fly up onto a roost. She has her own roost which is lower than the big chicks. Here they are:
Thumb of 2018-05-06/greene/482f8a

Update May 16, 2018
A sudden rainstorm happened, halting work on the coop. It will be raining on and off for the next ten days so I’ll have to run between the raindrops to get any work done.

Yesterday I was able to scrounge some plywood. I had been holding off finalizing the roof plans hoping to avoid unnecessary expense. The free plywood helped to decide the final roof design.

Here is a handy video showing how to make the bird’s mouth cuts for the roof rafters.
https://www.youtube.com/watch?…

Update May 19-20
Working between raindrops and rain showers I managed to get a bit of work accomplished. I made a frame for the floor of the exterior nest box. I was especially proud of myself for not making any mistakes. It came out correctly the first time. It may not look like much but I made it in such a way that I can add insulation to hopefully keep the chickens a bit warmer in winter.
Thumb of 2018-05-21/greene/199bbb Thumb of 2018-05-21/greene/e8a4cd Thumb of 2018-05-21/greene/85cbba

Noon, May 21, 2018
I had to rethink part of the floor unit for the exterior nest box as some of the plywood would not cooperate. I decided to use the fence pickets instead. Much easier for me to work with but it did use up quite a few extra screws. The rain held off and I was able to cut and fit everything, then I cut the insulation and screwed down all the little floorboards. It looks rather nice.

The insulation is Eco-Foil 48″ and was totally free. A neighbor tossed the entire roll as trash and I made it fit into my little car. That was back in March. When I picked it up I had no idea what I would use it for but I never argue with free stuff.
Thumb of 2018-03-08/greene/f18084 Thumb of 2018-03-08/greene/e0f7c0

Here is the floor showing the insulation, and the finished floor. Everything still needs to be caulked and painted.
Thumb of 2018-05-21/greene/2fe3a3 Thumb of 2018-05-21/greene/3b4742

Update May 29. 2018
There is a sub-tropical storm named Alberto that decided I needed to take a break from working outside. In between rain showers, I managed to get a bit of work accomplished. Installed one 2 x 4 horizontally on the west-facing side of the coop, cut 11 siding boards to length, managed to install 4 boards before the drill/driver ran out of battery.

(There should be a photo here but it’s lost in my laptop somewhere; if I find it, I’ll add it later.)

One of the things I have been stalling on is the east-facing side. That is where the clean-out door will be. I want to incorporate a window into the door itself. I’ve used the rainy days to research and gather useful information. What I want to do is avoid buying a ready-made window.
Here is one of the ideas that I am considering:
https://www.youtube.com/watch?…

There is a window in a door here:
https://www.youtube.com/watch?…

Sliding windows using polycarbonate:
https://www.youtube.com/watch?…

Lots of possibilities. I am still deciding how to make the window within the door.

Too early to think about making a chicken tractor but I wanted to save this link showing how to make tractor wheels. http://avianaquamiser.com/post…

I found a better plan for a chicken tractor. Joel Salatin is like the guru of pasture-raised chickens. This opens up lots of new possibilities and may reduce the amount of work I do to keep the ‘Back 40’ mowed.

https://www.youtube.com/watch?v=O1-MbPwaY6Y

John Suscovich worked out an improved chicken tractor and is selling the plans.  https://farmmarketingsolutions.com/stress-free-chicken-tractor-plans/

Okay, back to the coop. Too late to start over but if I build another coop it will look very much like this…except it will be painted funky colors.
https://www.seattlesundries.co…

Update June 19, 2018
It’s hot. Really, really hot. But it’s not raining so I went out back to work on the coop. As you know, I had a hard time figuring out how to make a ventilation door to keep the chickens cool yet safe from predators. The idea finally formed, it took a few weeks to get it all together in my head. I bought hardware, adhesive, gathered stuff together. Then I misplaced the hinges. I had to drive back to Home Depot and buy more hinges.

Today was the big day. The ventilation door is now attached to the coop. Yippee! The photos may not make sense as the door is just hanging in the middle of the space, but it will be perfect after I get all the other bits and pieces attached. After that, I will tackle the roof. Then the run. No big deal. I have the rest of my life to finish the coop.
Here is the ventilation door:
Thumb of 2018-06-19/greene/1b1d99

Oh, and the chickens? Sadly, they are still in the guest room. No sane person would have chickens as a guest. But they are good company. They chit chat, they have learned how to beg for treats. Two days ago I gave them an overripe banana. Yesterday they got a lovely tomato. Today I picked the seed heads of the Bahia grass and a few sprigs of Goldenrod stems. Two of the chickens now allow me to pick them up without them freaking out. One chicken does not care to be picked up so when I approach he/she flies up, bounces off my head, jumps on my back and runs away. Well, as far as a chicken can run inside a guest room. It will be a happy day when they are finally living out back where they belong and I can clean, sanitize, deodorize, clean again and reclaim the room.

Update: July 11, 2018
The chickens are outside!!
Since I don’t yet have enough money for the materials to complete the chicken coop I made a smaller, temporary coop. I am calling it a coop-ette. (Probably not a real word.) I should back up and explain how this happened. A few weeks ago I responded to a post. Someone wanted to rehome their rabbit and a rabbit hutch was included in the small rehoming fee. It was such a good deal that I rented a truck from Home Depot and drove over to pick up the hutch and the rabbit. Well, surprise, surprise! The rabbit belongs to a magician! It seems the tiny rabbit grew too large to fit into the hat for the magic tricks so it needed to go to a new home. As for the hutch, well, I had plans for that. Using the materials on hand I raised up the hutch, added 1/2″ hardware cloth, secured the existing doors, added a new door and…here is the result.
Thumb of 2018-07-12/greene/31454f
So finally, after 22 weeks of residing in the guest room, the chickens are outside where they belong. Oh, and the fun part. I picked up Dottie and one other chicken to carry them out to the new coop-ette. Then I went back inside the house to pick up two more chickens and what do I find? Look:
Thumb of 2018-07-12/greene/5498a7
After I managed to carry all the chickens outside, got the food and water in place…guess what?! Look…another egg!
Thumb of 2018-07-12/greene/996737
The chickens are a bit crowded right now but today I will work on adding a temporary outside run. I have a dog exercise pen and will add a bottom frame with fence wire on the ground and poultry netting on the top.
Thumb of 2018-07-12/greene/a70b75 Thumb of 2018-07-12/greene/4e3a21

Update: July 13, 2018
The chickens are enjoying being outside. The dogs and I visit them several times a day and make sure they are okay. This morning I rigged up the exercise pen and the chickens quickly learned to take advantage of the extra space. I also added an extra roosting bar as they were a bit crowded on the single bar.

Late this afternoon I made a run to the local Walmart to buy a few small solar lights as the chickens are accustomed to having a nightlight (not too spoiled, are they?). Just before dark, I was happy to see that all the chickens had put themselves to bed and were up on the two roosts…well, except for one who was up on a shelf. I suspect that one might be a rooster rather than a hen or maybe it’s just acting as a big sister. So far, they have given me 3 eggs.

Update: September 10, 2018

Getting up to 4 eggs per day now so at least 4 of the chickens are girls. Have not heard any of them crowing. That’s a good thing. Oh, and those folks across the street (remember the dog with the bone in his throat?); they came knocking asking or help. Seems there was a dog in their yard killing a chicken. So, since I am the designated Dog Whisperer in these parts, I walked over and calmly placed a looped leash around the dog’s neck. The beautiful, huge red-nosed Pitbull only half-grown and really peaceful. Police, Animal Services and the Sheriff arrived to take control of the situation. All in a day work for me. Just sayin’.

Update: September 21, 2018

If you have never heard of or visited Facebook Marketplace, you don’t know what you are missing. It is a great place to buy and sell. Kind of like a yard sale but it’s one item and one person at a time. I responded to an offer for clear polycarbonate roof panels. I believed they were something like $6 apiece. That’s a lot better than the regular retail price so I drove 25 miles to buy a few. Nope, the price was wrong. They were only $3 each. Technically, $2.99. I bought 12 and will not be able to construct the roof for the chicken run. WooHoo!!

Update: An entire year later.
Ugh! Things happen. Nothing gets done. Why complain? Just start again where you left off. Unless, of course, you have decided to totally rethink and redesign the whole chicken coop plan.

Update: October 2019
I had an idea. Looked online. Not sure if anyone has done this yet. I bought a used trampoline; it’s a 12-foot one. It was completely disassembled and I had one heck of a time trying to put it all together without instructions but the basic plan is to assemble it in 2 parts, like two half circles. Then the half circles will stand up just like two arches. Yep, that’s the plan. The center will be 6 feet tall so there will be plenty of room for a human door. I’ll be adding metal pipes to make the width…not sure of the size yet but probably about 8 feet wide. Add wood to the ‘top’ to allow corrugated roofing panels to be attached. That should keep out most of the rain. The trampoline fabric will become a sunshade. Still working on the idea. Almost ready to take some photos.

Posted on 1 Comment

Armadillo on Lemon Ice.

Armadillo on lemon ice is a catchy title, but not exactly accurate.
Let’s see if I can get from an armadillo to lemon ice in just a few steps. For this, we will need an armadillo, some rabbits, a Puggle dog, some neighbors, a garden, two refrigerators, melted ice and finally, lemon ice. Let’s get started…

Armadillo (just one):
The other day my dog saw his first armadillo. Jack is a Puggle which is an F1 hybrid cross of one Pug male and one Beagle female. He’s a ‘designer’ dog. He looked at me for clues – Do I chase it? Play with it? Kill it? Eat it? I held the leash very tightly and allowed him to smell just enough to get the scent. The armadillo got away safely in the drainage culvert that runs under the road. Some armadillo can carry leprosy. http://www.cdc.gov/leprosy/exp…

Rabbits (just one to start with):
One neighbor had a pet rabbit. Since it was too much work to clean the cage and his children couldn’t remember to feed it he set the rabbit free. What harm could one little rabbit do? Another neighbor thought it was cute to have a rabbit in the yard so he got a rabbit and let it run loose. Hmmm, one rabbit plus one rabbit equals…..no, don’t tell me. I’ll figure it out. While my English teacher said I would never be a writer, I was good at math and earned aa 95 in Algebra. One plus one equals….um….drat. Guess the answer is not always ‘two’. Oh, goody, do I get to use the word ‘exponentially’ now? If you need a bit of help, try this link:
http://www.algebra.com/algebra…

Yep, what we now have in my small neighborhood is, as Yosemite Sam would say…”Rachin’ Frackin’ Varmint Rabbits”!!! They are everywhere. Looks like a low-budget Alfred Hitchcock movie with fur instead of feathers and I sure ain’t a Tipi Hedren look-alike.

It is thought that pet rabbits released into the wild are supposed to have little chance of survival. However, since these rabbits are in a semi-private mobile home community with plenty of food and shelter and, thanks to the well-placed and numerous speed bumps, the vehicles rarely drive more than 10 miles per hour, and few natural predators, the rabbits are thriving. This is not a good thing; there are numerous links about diseases that can be passed from feral rabbits to humans as well as to dogs. It is very frightening but you can do your own research for that.

Woke up early this morning…way too early for my old body…a neighbor needed a ride to the local Veterans’ Administration Medical Clinic as he had to catch the VA bus heading over to South Carolina this morning for some long-overdue medical tests. If he arrives late the bus will leave without him so I must pick him up on time. I cannot be late. No time to make coffee. I have to walk the dog. Oh, drat. Just my luck at 6 in the morning as I am getting ready to walk my dog, the silly dog decides to take off like a bat on methamphetamines chasing two rabbits.

Note; Yes, I am a responsible pet owner and always put a harness and leash on my dog; unfortunately somewhere between the word ‘harness’ and the word ‘leash’ my dog took off running. This is NOT Jack’s usual behavior.

I had only 30 available minutes in which to panic, cry, walk as fast as I could around the entire neighborhood (four times), clap my hands, whistle, and call my dogs name loudly and repeatedly to make sure all my neighbors could enjoy the early hour as much as I did. My antics set all the neighborhood dogs to barking. Oh joy, I felt like a mother Penguin when among all the barking dogs I was able to identify the sound of my own little dog barking.

Using stealth and cunning I quietly walked between two homes following the sound of his barking voice. I got on my hands and knees in the mud to crawl through someone’s garden and under their Chayote vines Very healthy looking vines you got there mister! I had thought these were cucumber vines but learned that they are Chayote; I will add a link below so you can see photos and learn more about Chayote. I worked my way around to the back of their tool shed. Ah, there was my dog Jack, baying his head off like he had treed a raccoon. He was very proud of himself. He was alternately barking, baying and digging, still trying to reach the rabbit that had hidden under the shed.
Thumb of 2014-08-06/greene/7d8322

No, Jack, No. It is not polite to dig holes in other people’s gardens.

I lifted and carried Jack, as I crawled out from the vines, and was able to get him safely home arriving at my house at 6:26 in the morning, dead tired and covered in mud. Whew, I have four minutes to spare! I cannot be late to drive my neighbor to the VA or he will miss the bus and I cannot get angry with my dog because he is part Beagle – I mean, chasing rabbits is what they do, right? Don’t worry; no rabbits were harmed.

Good dog, Jack.

Ice (or lack thereof):
At exactly 6:30 I picked up the neighbor and drove him to the VA in time to meet the bus; ten minutes later I arrive home and check my emails, skip having coffee, then give another neighbor a ride to her job. Did I mention that my neighbors seem to think that I run the local free taxi service? Finally, I walk over to my daughter’s house to pick up my grand-dog. As a dutiful dog-sitter, I always check for a note in case I need to give the dog an allergy pill or an extra poop walk.

Oh, goody. How’s this for a note:

“The ice cubes are melted; the refrigerator is officially dead, so on my way to work I stopped at the other house to turn on the spare refrigerator so it can get cold.”

I realize that not everyone has a spare house and a spare refrigerator, but my kid has both; God blessed her with good fortune. Can you read between the lines on the note? Since I am a mother, here is the way that I read the words on the note:

“Mom, in your spare time, since you are retired and have time to drive strangers all over for free, and while walking your own dog and baby-sitting my dog, can you please transfer all the food from the dead fridge to the working fridge in my other house halfway across town…since you like to drive the car so much”.

Aha! I think I really should have started my day by making coffee. But I am smart. I went to Lowe’s where they sell refrigerators and the coffee is free. Oh, dear, on this particular day, the customer service was lousy. They may be able to match prices but they cannot always match customer service.

So I went to another store with free coffee and refrigerators, oops, I meant that they sell refrigerators and the coffee is free. Home Depot has the most excellent employees; maybe the employees are happy because they get to write their name using Sharpie markers on their snappy orange vests. I was shopping for a brand new smallish fridge. It had to be in my price range, light enough for me to carry up four steps while dodging spiky cactus and delicate succulents into my daughter’s house. Did you know that while there is no written rule about backing into spiky plants, there is a written rule that says if you lay a fridge on its side you cannot plug it in until it has been in the upright position for at least 24 hours? Who writes this stuff – airline hostesses? So the fridge also had to be small enough to stand upright in the mouth of the car trunk. Yep, success. I bought a cute little stainless steel beauty of a fridge. It’s a beauty.

From the comfort of my daughter’s kitchen the dogs watched in awe as I unloaded the huge box from my car, backed into a Yucca plant (Ouch!), then ‘Yosemite Sam’d’ the fridge up the four steps, ripped open the flimsy cardboard carton, carefully avoided cutting my fingers on the numerous staples, cursed the Styrofoam. Really, did they use enough Styrofoam? I mean, this fridge only had to come from China; how much Styrofoam does one fridge need to feel safe and comfy on a ship traveling halfway around the world? All four of my grandparents traveled to America on ships and were quite comfortable even before Styrofoam was invented. That was roughly 35 years after staples were invented, but several years before the refrigerator was invented!!

I successfully transferred the food from the dead fridge to the new fridge. Oh, sorry, this might be helpful. Some of you may use the word ‘frig’ and some may use ‘fridge’ – http://www.grammarphobia.com/b… Okay, back to my story. The bad news is that when the old refrigerator, fridge or frig died the strawberries and raspberries didn’t survive the temperature fluctuations in the freezer compartment. Some corn on the cob looked a little iffy, too. Since I did not own any chickens some of the food went into the compost bin and some into the trash. Remind me to get some chickens in case this ever happens again.

The good news is that Luigi’s lemon ice was just fine. In fact, it was delicious! The dogs and I thoroughly enjoyed it. So there you have it – I managed to get from an armadillo to lemon ice in just a few steps.
The End

….. ….. ….. ….. …..

Update on our local animals:

In the Spring my neighbor started her first kitchen garden. Lately, it seems that ‘something’ has been eating all her plants and digging up the soil. I do not have the heart to tell her that it is most likely the rabbits eating the plants and the armadillo doing clean-up eating the worms and grubs.

The other day her friend saw a strange animal in the yard and asked, “What is that?”
My friend managed to snap a couple of photos using her phone (did I mention that my friend is smart and has a SmartPhone). She sent the pics to my phone somewhere around half past midnight.

Truth is, there is a slight lag in the time needed here. It was necessary for me to take my phone to the T-Mobile store and ask the helpful clerk to please, please, please (in my younger days I might have batted my eyelashes, but I guess being an old lady is enough to encourage the young men to offer assistance) would he kindly push the correct buttons on my phone to send the pics to my email.
Yes, I admit that am not smart enough to own a SmartPhone.

Here is the armadillo. It may be the same armadillo that my dog Jack saw.
Thumb of 2014-08-06/greene/bf2fa6 Thumb of 2014-08-06/greene/b5048e

Here is one of the cute little adorable feral bunnies at midnight. Eeeek!
Thumb of 2014-08-20/greene/565031
There were 17 more rabbits running loose plus another batch of babies, but this was the only one who sat still long enough for his close up.

Update September 5, 2014
The rabbits are spreading. They are now in several yards and gardens. This could get ugly. Or maybe we should just plant more carrots?

Update:
Twenty-four hours later the mint, garlic chives, Thai basil, and several young Sassafras in my yard have been chewed down to almost nothing. These adorable little bunnies also like to dig random holes for me to trip over.

Update: October 11, 2014
There was a litter of bunnies in one neighbor’s yard. The little rabbits are weaned and eating on their own and people are trying to trap them to keep as pets (or to raise responsibly as food). One of the young rabbits is living temporarily in a cage-within-a-chicken-coop in my yard waiting to be re-homed far away. My hope is that every one of these wascals er, sorry, I had an Elmer Fudd moment…maybe these rascals can find a new home – and far away from my garden, please.

Thumb of 2014-10-13/greene/113c7d Thumb of 2014-10-13/greene/1ab42e Thumb of 2014-10-13/greene/cbfc73

Update on the feral rabbit situation.
We still have the feral rabbit problem. Since we can’t kill or contain the rabbits, neighbors are building fences to protect their plants. I made a fence for my daughter’s small kitchen garden. (Sorry for the shady photo.)
Thumb of 2015-04-24/greene/70d9ac

Today my friend PlantSister sent me a bit of information; a link with lots of natural rabbit repellents. Maybe I will try some of these methods.
http://www.how-to-hunt-rabbit…

* * * * * * * *

Update June 1, 2015
My daughter’s little garden is producing lots of veggies and herbs. The fence has kept out the hungry feral rabbits. Sometimes daughter’s dog is allowed to enter the little garden fence and help with the weeding and harvesting. So tranquil; so peaceful.
Yikes!! The dog suddenly lunges under the bean plants, through the tomato cages, under the cucumber vines.
What the ???
A little gray rabbit that had been hiding under the leaves of the bean plant was spotted by the dog and all heck broke loose. We have no idea how the rabbit entered the securely fenced garden but it quickly leaped over the fence and escaped. That was a few days ago but the dog continues to look under the bean leaves, under the tomato leaves, under the cucumber leaves…she knows there is a rabbit in that garden somewhere!
* * * * * * *
Chayote link:
https://garden.org/plants/view/111588/Chayote-Sechium-edule/
Puggle link:
https://www.allthingsdogs.com/puggle/

Posted on Leave a comment

Cricket Farming Tutorial – Part 1

My latest venture will be raising crickets. Why?

Right now my dog Jack is obsessed with catching and eating the crickets in the yard. I don’t think this is a good idea, but Jack is stubborn. I am thinking back to when my younger daughter had a pet Mediterranean House Gecko. They are very small and need tiny food. So each week I trudged to the store to buy the smallest crickets. There is no price break just because the crickets are itty bitty. Then we learned about flightless fruit flies. Hmmm. Daughter is creative and figured out how to raise her own flightless fruit flies. Success!! So maybe I can raise crickets to keep Jack happy with some left over to feed the chickens.

Since I don’t personally know anyone who raised crickets I turned to the internet. Several days later I am confident that I can do this. Here is a short list of the videos that I found helpful. Each video has some good methods; some a bit better than others. I gleaned the best methods and ideas from each source and will begin the venture.

This video is factual if a bit boring and has good information for anyone wanting to grow crickets on a small scale.

https://www.google.com/search?q=how+to+raise+crickets+youtube&oq=how+to+raise+crickets+youtube&aqs=chrome..69i57.5059j1j7&sourceid=chrome&ie=UTF-8#kpvalbx=1

This is a very good video with plenty of information and a few laughs along the way.

https://www.youtube.com/watch?v=YSL4BVG8JSQ

This is an entire series of videos showing step-by-step how to farm crickets. There are at least 8 videos; tons of good information plus some stuff you may not have thought you needed to know. I think James looks like a Disney character but he certainly knows his crickets.

https://www.youtube.com/watch?v=Ertha9zlcv8

From this video, by Beth (myboysanme3) I learned something very important. Use mesh to cover the egg-laying material so the larger crickets will not dig up and eat the eggs before they have a chance to hatch. Thanks, Beth!!

https://www.youtube.com/watch?v=pvmYtgHvw4I

Here is one of my favorites. I didn’t learn much except that crickets love to climb so when it’s time to clean the containers I won’t have to become a cricket wrangler. Ghann’s Cricket Farm was featured on Diry Jobs; how cool is that?!

http://www.ghann.com

Here is one place to find the Dirty Jobs episode:

https://www.tvguide.com/tvshows/dirty-jobs/episode-25-season-5/cricket-farmer/279523/

My goal is to grow crickets to feed my chickens and to keep my dog amused. Some people have taken cricket farming to a whole new level. Check this out…and not just crickets!

https://www.youtube.com/watch?v=wB1GMwqcpR4

Okay, that’s part one of the tutorial. Take some time to look at a few of the videos and you’ll be ready to start farming crickets by the time I post Part 2.


Posted on Leave a comment

Chicken again?

A few of years ago my dog Jack and I were taking a wee walk before bed – don’t worry, this is not a dog story; it’s about a chicken. Oh, and it was Jack that was gonna wee, not me. Jack is smiling at my small attempt at humor.
Thumb of 2015-02-26/greene/8e8a15

It was about midnight, a very dark night with no moon. Jack has pretty bad eyesight.
He sees okay when he is up close, like this:
Thumb of 2015-02-26/greene/0a6620

Because his eyes are bad he alerts when he sees anything move, anything at all. It can be a leaf, a squirrel, my neighbor’s homemade wind chimes or even a plastic bag. When he started tugging at the leash trying to get to something on the ground I held him back saying, “Jack, that’s nothing. It’s only a plastic bag.” But no, Jack insisted that he be allowed to check it out. No, Jack, I don’t want to investigate your dumb plastic bag. I’m the grown up and I am smarter than a dog; I will show you that you are wrong.

So I gathered up a handful of pine straw and, taking careful aim, I chucked he pine straw at the plastic bag…and the bag clucked.

Clucked?

White plastic bags do not make clucking noises, not even at midnight on a moonless night. My status as the smartest one in the family is in trouble. Well, dang. Paint my face red and call me a stop sign. It’s a chicken! My dog found a chicken. Good boy, Jack, you get a biscuit. Maybe I should get my own eyes checked?

Since I was positive the chicken belonged to my across the street neighbor who has chickens and roosters, I gathered up the chicken and, it being midnight and all, I had to find a place to keep the chicken for the night so I could return it safe and sound to my neighbor. Note to self: The neighbor wakes up early. Remember to set an alarm so you can catch him before he leaves for work.

Not having a chicken coop of my own the only solution I could think of was to stash it for the night in my zippy plastic greenhouse. This little greenhouse was brand new, just assembled and never had a single plant inside, just rows of neatly stacked plastic pots.
Thumb of 2015-02-25/greene/1fce65

The chicken should be fine in there for just one night; I’ll return the chicken to my neighbor in the morning.
Well, that was the plan anyway…but…keep reading.

Since my neighbor is Latino, I used my very best ‘Spanglish’ and some hand gestures to inquire if he had lost a chicken, a white chicken. He said, “No tengo gallinas blanco.”

What did he say? 
He said he has no white hens.
Hmmm?

So I asked him whose chicken it was? At least I hope that’s what I asked, my Spanish is not all that perfect. Oh my, he got this funny look on his face, kind of like this…
Thumb of 2015-02-25/greene/33a77c
…Okay, that’s an exaggeration, but he did have a funny look on his face. He used his right index finger to point directly at my heart to indicate that it was my chicken. Out of respect for my readers who may be vegetarians, I will not tell you what he suggested I do with ‘my’ new chicken but he made a gesture using that same finger across his throat.

Great, just great. I carried the chicken home. I was now the proud owner of a single chicken and no chicken coop in sight. This will require some thought. Guess the chicken can continue to stay in the greenhouse while I make plans to build something more appropriate. The zippy plastic greenhouse is a good temporary coop, right? I mean, how long could it take to build a little house for a chicken? Building a coop for one chicken should be easy.

I wondered if she will ever lay eggs?

How do you know it’s a girl chicken?

Each day I checked and each day…nothing. Lots of poop. No eggs. Lots of flies wanted to join the party. I bought one of the long sticky things – you know, the kind that when you try to feed and water chickens in the morning before coffee when you are half asleep you end up with dead flies and sticky tape in your hair?

http://www.epestsupply.com/ima…
Yep, that kind. Don’t worry; I have scissors and shampoo.

Okay, Plan B.
https://s-media-cache-ak0.pini…
Yes, much better and safer for my hair.

You may think that since I wasn’t finding any eggs that maybe it was a boy chicken?
Or maybe I didn’t know what an egg looked like? Let’s review what I know about eggs.

Look at this egg…
Thumb of 2015-02-25/greene/21a991
Here, look more closely. That is an Anole lizard egg.
Thumb of 2015-02-25/greene/0696cb
…when it hatches it will look like this:
Thumb of 2015-02-25/greene/69747a
and it will learn to hunt while hiding in the Clematis. One of the little Anole lizards would one day grow up to become a daily Banner on All Things Plants which now has a new name…The National Gardening Association.
Thumb of 2015-02-27/greene/360993That image is a bit small. Go here to get a better look:

https://garden.org/thread/view/29100/Banner-for-September-14-2014-by-greene/

This is not an egg. It’s a tiny yellow, slightly overripe Asian Eggplant.
Thumb of 2015-02-25/greene/5ac597

This is not an egg either. It’s an Ichiban Eggplant – gosh what a fun word – Ichiban.
Thumb of 2015-02-25/greene/5fffe1

Hmm, here are some eggs.
Thumb of 2015-02-25/greene/e98a7b

I found these in a nest inside the old metal watering can, a gift from Liz; She is an accomplished knitter; this is Liz modeling a Lillehammer sweater.
Thumb of 2015-02-26/greene/4e2a63

Liz is my plant friend; we met via The Savannah FreeCycle Network. Soon after we met she sold her house and moved ‘back home’ to Oregon, but before she left she gave me all of her compost…lots, and lots, and lots of her compost. All I had to do was carry it from her backyard out to my car and take it home. Easy, right? I was digging and hauling compost for three days in a row. Whew. Big job.
Thumb of 2015-05-17/greene/99be66 Thumb of 2015-05-17/greene/a0ae80 Thumb of 2015-05-17/greene/6873a5 Thumb of 2015-05-17/greene/f50604

Liz also gave me several of her garden tools, a lovely huge garden cart, and taught me to pronounce Or-a-gun properly. Thank you, Liz!!
Okay, back to the eggs in the watering can. They are not chicken eggs; they are the eggs of a Carolina Wren. See the watering can?
Thumb of 2015-02-25/greene/792089 Thumb of 2015-02-25/greene/3c2fdcThumb of 2015-02-25/greene/97e5a4

The Carolina Wrens thought this looked like a good place to make a nest. Turns out they had good judgment. They raised a fine family of little ones. It’s really difficult to take a photo of a bird on a nest built inside a watering can. They should teach this stuff in school. The birds were a bit camera shy and they sure were noisy – but they were much too fast for my digital camera to capture an image. They fledged and flew and their offspring live nearby.

These are chicken eggs with googly-eyes, but not exactly what I was hoping to find from my chicken.
Thumb of 2015-02-25/greene/24e290

Speaking of googly-eyes, one day when you have nothing better to do or don’t feel like weeding your garden or cleaning the toilet, check out the Saturday Night Live skit “Indoor Gardening Tips from A Man Who’s Very Scared of Plants” starring Christopher Walken:
https://screen.yahoo.com/googl…

Oh wait; I just remembered something. I used to teach classes so people could learn to make a type of decorated Ukrainian Easter Eggs called Pysanky. They look like this…
Thumb of 2015-02-25/greene/919e3b Thumb of 2015-02-25/greene/9bdcdf

I would be very surprised if any chicken were to lay eggs like this. Well, what I mean to say that yes, a chicken was involved but that was before the candle was lit and the wax and dye were applied. People still exchange Pysanky eggs at Easter similar to exchanging a greeting card – don’t tell Hallmark about this or they might try to corner the Pysanky market. Remember to buy stock in the Hallmark Company if this ever happens.

While I was preparing to teach the class I did my homework, studied, made practice eggs and read several books. One of the books was by Johanna Luciow.
https://www.amazon.com/dp/0960250239/

In the book, there was a reference to an article in the April 1972 National Geographic Magazine. Wow, finally a reason to be thankful that I was a pack rat. Yes, I had every National Geographic since time began, right there in my front closet. A reason to be thankful that I was raised by parents who survived The Great Depression and taught me to NEVER throw anything away. Not ever.

Speaking of Easter, ever wonder what the Easter Bunny does in his off-season? He must do something to support himself during the offseason, right? Or maybe his wife hands him a ‘honey-do’ list – Do you mean a ‘Bunny-Do’ list? – so he can catch up on home repairs.
Thumb of 2015-02-25/greene/1734ee

Speaking of holidays, here is my Holiday Cactus. When I bought it at Lowe’s from the clearance rack it looked nothing like this and only cost one dollar.
Thumb of 2015-02-25/greene/dad405

Success! An egg! First egg from Henrietta and it’s a beauty.
Thumb of 2015-02-25/greene/777d10

Okay, I have to be honest. The fine-looking egg in the photo is not the very first egg. Grab a cup of tea and get comfortable; I will explain.

For days and days I checked looking for eggs…well, I guess I already told you that, right?… and no eggs. I was ready to give up on this girl or is it a boy?. Each day I brought food, lots of food, and water, lots of water which she or he happily spilled. At least the chicken had clean feet. On good days she or he was allowed to play in the garden and hunt for insects. Each night I convinced her – Yes, I know, she/he, got it. – convinced her or him to go into the plastic zippy greenhouse to be safe for the night. Yes, I still planned on building a coop. Keep your feathers on. Then one evening the chicken refused to go into the little greenhouse. The chicken was hiding under the house.

Okay, technically it’s not a house. I live in a metal box on wheels. It’s a 1965 Statler model mobile home that used to keep me warm and dry but now does neither. Some nights I thought I would be better off sleeping in the zippy plastic greenhouse with the chicken. If you think I am exaggerating, look for yourself. Front view and back view of my ‘house’. Even after I cleaned it up a bit it only looked this good…the ‘house’ didn’t get any newer or any larger.
Thumb of 2015-06-25/greene/c04d82 Thumb of 2015-06-25/greene/f4e1bd

It’s still a metal box except now it is partially hidden by a Rubbermaid Tool Shed, and the viewer’s eye is drawn to the new patio blocks. Thumb of 2015-06-25/greene/51c678

Can we please get back to the story? Okay, back to the story…the chicken was under the ‘house’.

He or she wouldn’t come out from under the trailer. I tossed a few things at the chicken in an attempt to get him or her out in the open, a stick, a rake, a broom, a hoe. Nope. I learned two things:
One – I have a bad aim at throwing things under a house. Wasn’t any good at skipping rocks on the lake either.
Two – the chicken would not budge. Stubborn chicken.

Seemed that I had no choice but to pretend I was a raw Army recruit and crawl on my belly under the house, er, trailer to retrieve him or her. This was my view under the trailer…guess it hasn’t been cleaned in a while. Probably not since 1965.
Thumb of 2015-06-25/greene/9f275f

I kept my butt down to avoid prying eyes, bird droppings and sniper fire, slowly inched forward on my elbows and toes…gradually making progress, praying there were no Black Widow spiders crawling with me… or on me.

Hold on a minute…what is this?

I blurted out an expletive.
Thumb of 2015-02-25/greene/2127aa
Hey, don’t laugh; that’s a real cereal product, wow!
https://www.amazon.com/dp/0960250239/

Thumb of 2015-06-25/greene/a70759
In a shallow indentation in the sand under the trailer, there were one, two, three….more than 18 eggs!
My vision was blurry. I shook my head, squeezed my eyes shut and looked again…

Thumb of 2015-06-25/greene/28a1c4
Oh, sorry. My eyes are fine; it’s the photo that is blurry.

No wonder she…SHE…SHE didn’t want to go into the zippy greenhouse. She had made herself a nest in the sand under my house and wanted to hatch her eggs. Good girl, you get a biscuit, er, some crumbles, some mealworms. So she’s a girl. A female chicken. A gallina. Wait until I tell my neighbor! Aren’t you gonna tell the chicken that, without a rooster, those eggs are not gonna hatch?

I will save myself some embarrassment and not describe what I must have looked like to the neighbors as I crawled back out from under the trailer. The reality of it is that I actually had to crawl back under the trailer with a bowl to carry out the eggs and a camera to document my amazing discovery.

Not knowing how old some of the eggs might be, I put them in a bowl of water and discarded any that were floaters; cleaned the good ones with a vinegar/water bath and here is what the good eggs looked like.
Thumb of 2015-06-25/greene/a5d29f

Note to self: The float test is not a reliable way to know if an egg is safe to eat. For a really long and intelligent explanation, head over to a blog called The Chicken Chick here: https://the-chicken-chick.com/egg-float-test-indicates-approximate/

That was only the beginning…Jack and I enjoyed fresh eggs almost every day. Sometimes the chicken would skip a day and there would be no egg. But then again some days she outdid herself and produced a double-yolk egg. I was impressed with the chicken’s talent and gave her much praise along with some crushed eggshells.
Thumb of 2015-02-25/greene/839771

Note to self: The heat was too high when cooking that egg.

Wow, I can remember the first time I ever saw a double yolk egg. When I was twenty-one I was on a camping trip with friends, we climbed Mount Washington in New Hampshire…First, we camped at Great Gorge, in the morning we climbed via the Tuckerman’s Ravine trail and came down via the Jewell trail…best walk in my life! Note: I did not know at the time that this is one of the most difficult and dangerous hikes, duh!! The following morning we stopped at a small local restaurant for breakfast. Naturally, I ordered eggs. The locals went crazy. Why are they excited that I ordered eggs; doesn’t everyone eat eggs for breakfast? Seems that it had been a slow day so the local boys were making bets on which egg would contain a double yolk. Yep, I should have put some money down because my egg was the winner. A double yolk egg, the first one in my life.

Okay, since this is now officially a hen and not a rooster, I planned to keep her. Of course, she needs a name. I asked my daughter to suggest a good name. She’s good at picking names; remember? She gave my dog Jack his name. My daughter got a sly look on her face and said, “Henrietta”. What? Don’t you like it? It’s a good name for a chicken, plus it lets me take another trip down memory lane

When I was very young, age 5 through 9, I had two best friends; they were both named Holly. One Holly was a Girl Scout, owned a jackknife, could climb a tree, play the piano while singing Pogo songs, hatch Preying Mantids by the thousand in her bedroom, got me started at oil painting lessons at the YWCA, and had a marionette named Henrietta. The other Holly took dancing lessons, had a Lieutenant Colonel for a father and a mother who reminded me of Zsa Zsa Gabor, had a parakeet named Petey, and had a pet chicken named Henrietta. Can you believe it? What are the chances of that? Two girls so completely different yet both were Holly and each had a Henrietta of their very own. Okay, back to my story…where was I? Is there any tea left in the pot? This long story is making me thirsty.

After a bit of tender loving care, a lot of chicken feed and several Rube Goldberg attempts to keep the water bowl from getting overturned, finally, Henrietta became a good looking, healthy chicken. Here she is having a lovely day out in the garden.

Thumb of 2015-06-25/greene/a0f172 Thumb of 2015-02-25/greene/127475Thumb of 2015-06-25/greene/64ec0c

Henrietta’s gonna need a coop and it’s a cinch I won’t be asking the Easter Bunny to help build it. I shall build it myself. Will it look like this? 
Thumb of 2015-06-25/greene/79ba07 Thumb of 2015-02-25/greene/33926f
It will have a door that is secure and metal cans to keep the food and bedding clean, safe, dry and free from vermin.
Thumb of 2015-02-25/greene/ab4716 Thumb of 2015-02-25/greene/4a6799
There needs to be a chicken ladder so the girls can walk into their bedroom and nest area and a whisk broom to keep things tidy.
Thumb of 2015-06-25/greene/b298bc Thumb of 2015-02-25/greene/2d52f7

I’ll need to make a nest box…
Thumb of 2015-02-25/greene/17c76b
No, no, no. Wrong! That is not a nest box. It’s not even a call box. Plus it’s the wrong color to be the TARDIS.

This is a nest box. It may be simple in design but it will work better than a portable toilet when it’s time to gather the eggs.
Thumb of 2015-06-25/greene/b281db

I will build a chicken coop SO amazing that people will flock to see my flock!!
Sounds to me like someone had a little too much ‘tea’.
Thumb of 2015-06-25/greene/44e378

Well, that’s pretty much the story of the chicken. We had no idea where Henrietta came from or how old she was when Jack found her at midnight so long ago. After being a good, hard-working chicken, keeping us company in the garden and providing us with eggs for almost two years, Henrietta went to Chicken Heaven early one morning. She was a good old girl and will be missed. I had a tear in my eye when I had to buy eggs at the grocery store.

Hey, wait a feather-plucking minute. Why is the title ‘Chicken again’??? Where is the ‘again’ part?

Thumb of 2015-06-25/greene/778a05

Walking at midnight with my dog…can you believe it???
What are the chances of this happening twice in a lifetime? We found another chicken! Here, look for yourself…
Thumb of 2015-02-25/greene/f07e16 Thumb of 2015-02-25/greene/9e5327 Thumb of 2015-02-25/greene/b05aa1 Thumb of 2015-02-25/greene/fa105e

Since I already know that my across-the-street neighbor has no white hens this one must belong to the people who live in the house near the stop sign. I’ll be right back…have some more tea while you wait. I’ll just pop down to the corner to ask if they misplaced a chicken…

Thanks for waiting for me. I just walked back from the stop sign. Not good news. The people in the corner house said the chicken I found is not their chicken. They were kind enough to give me a bag of chicken food for ‘my’ new chicken. Oh, great…here we go again. I am once again the proud owner of a single chicken.

I only wish Henrietta hadn’t been so hard on equipment. All that’s left of the original plastic zippy greenhouse is… Well, look at the “before” and “after” photos of that greenhouse:
Thumb of 2015-02-25/greene/1fce65 Thumb of 2015-02-25/greene/abccd8

This year I have a new plastic zippy greenhouse.
Thumb of 2015-02-25/greene/43f846

There is no way I want to see a chicken demolish another greenhouse. She (or he) Oh, here we go again with the he/she thing! Oh, hush! He/she will not live in the new zippy greenhouse. But I’ve got to put this chicken somewhere. Oh, I remember. At the Savannah plant swap in October, someone was kind enough to give me their old chicken coop. You may recognize this small coop from my blog about the feral rabbits. I used this little coop for one of the feral rabbits that we managed to trap and re-home. The small coop was a safe place to keep a baby bunny safe for the night as he was getting adopted in the morning by a nice man who lives out in the country.

Thumb of 2014-10-13/greene/113c7d Thumb of 2014-10-13/greene/1ab42e Thumb of 2014-10-13/greene/cbfc73

Just for the day, I put the chicken into the old second-hand chicken coop. Guess it’s time to dust off those plans and get to work building that perfect chicken coop that I never managed to build for Henrietta. Just think of it, my dog Jack will get again get some eggs. And I get a new avatar!
Thumb of 2015-02-25/greene/1aeba3

Update April 2015.
The ‘new’ chicken named ‘Henrietta the 2nd’ turned out to be a boy, a rooster, a loud and therefore illegal animal in my area. So I found him a new home. He went to live with the kind folks who own Economy Feed & Seed in Savannah, Georgia. If you are ever in the area, stop in to visit them; they have a great selection of garden decor and lots of good old-time service and knowledge. Oh, and just wait until you see their chicken coop. Wow! Here is their Facebook page: https://www.facebook.com/EconomyFeed/

Update May 2015.
Since I no longer have a chicken, the small second-hand chicken coop was given away the other day to the Latino lady around the corner. (Shhh – Don’t tell anyone but she’s one of the people who released the rabbits and thus should take 50% responsibility for creating our feral rabbit problem). She had gotten a new baby chicken so I gave her the old coop. Twenty-four hours later I went to check on her little chicken and…it had been killed by one of the feral cats. She informed me that the same feral cat also has been killing baby rabbits. Can you imagine that! Hmm, guess what goes around comes round after all.

Update June 2015
After fencing their backyard and reinforcing the little chicken coop, my Latino neighbor got a new chicken and a rooster. I will not be the one to tell her that roosters are illegal here. Today I went to the feed store and brought home a 50-pound sack of feed for them; that should last them a while.

Update Jan 30 2017
The little chicken coop that I got second hand and gave to my Latino neighbor has now moved to the next trailer over. A new Latino family is using the coop. They are the 4th owners of the chicken coop. Some things are built to last.


Posted on 2 Comments

Two Dog Shirts for 50 Cents

Edited to add my new dog who was not here when this post was created. His name is Chico Burrito.
Very soon I will have to figure out how to make three dog shirts for fifty cents!

Okay…back to talking about dog shirts…
Have you seen the prices of clothes for dogs?! Yikes, unbelievable. It may be better to sew clothes for the dog yourself. But oh, have you seen the price of fabric these days?! But there is a solution.

Whether you say thrifty or cheap, or if you call it recycling or upcycling…getting two shirts for the dogs for a grand total of 50 cents seems like quite a bargain. Here is how it can be done.

We first take a trip to the local thrift store where we find a snappy blue sweatshirt in size 5.

We’ll start by assuming that you already have a sewing machine and know how to sew. Also, that you have decent scissors, pins, thread and that you know how to copy a pattern from a shirt that your dog already loves – just trace around the old shirt onto some brown paper. Here is Jack in his favorite red shirt. It fits him perfectly. Jack is too sexy for that shirt.

After running the sweatshirt through the washer/dryer we will prepare to cut away some of the seams. Leave the lower ribbing intact; don’t cut that part. And when cutting off the neck ribbing, leave the seam attached to the neck ribbing; we’ll be using that ribbing later.

Lay sweatshirt flat; prepare to cut away seams.


Here is the fabric ready to be used to make the two shirts.

Lay out the pattern pieces keeping the grainline in mind, pin in place then cut out. Save the scraps; they may be needed later.


This is what’s left of the sweatshirt after all the pattern pieces have been cut for two shirts. There is enough fabric to make half a shirt. All we need is another sweatshirt in a coordinating color but that’s a job for another day.

For the neckline, we will re-use the neck ribbing that we cut from the sweatshirt. Cut the fabric slightly longer than the pattern piece.

On the old red shirt, there was a small opening about the size of a buttonhole meant to be used to attach the leash to the harness. Since I found the hole to be too small for fat fingers, I made a slight design change. Instead of making a buttonhole type opening, I opted for this. And check out what a good color match the thread is.

Here is the same piece which has been assembled with the back and front pieces. 

Okay, since you know how to sew, the rest is easy. Just sew all the seams, try it on to make sure it fits, make adjustments as needed, and that’s it!

Jack loves his new shirt. It is very comfortable.

Uh, oh. Here comes trouble. George wants to see the new shirt. George tries offering a toy to Jack hoping that Jack will give up the shirt. No, that’s not gonna happen. Jack turns his back on George.


Problem solved. I gave George the red shirt to wear and Jack is happy in his new blue shirt.


George doesn’t know how to read yet so he has no idea that the title of this page is “Two Dog Shirts for 50 Cents”. I will make the second shirt and George will be very happy, plus he can keep all his toys.

Hey, I found a great site. Upload your own images to Jigsaw Planet just like this:
https://www.jigsawplanet.com/?rc=play&pid=2fdee15435c0

Posted on 2 Comments

It’s my birthday!

It’s my birthday!

I feel that since it is my birthday that I should decide what to do today. I had offers to go out to a nice restaurant for lunch, but no, I don’t want to get dressed up. I want something different on my special day.

So I dressed like a bum and took my dog for a drive to Tractor Supply. Jack loves to ride in the cart. Jack actually thinks that Tractor Supply is PetSmart, but hush, do not tell him the truth!

Jack met so many friendly people who admired him, petted him, shook his hand, allowed him to kiss them and paw their clothes. I am surprised at the number of people who have heard of a Puggle but have never actually seen one. I am beginning to see what it feels like to own a dragon, a unicorn or a leprechaun.

Jack was a happy boy today. Which made me happy.

I bought dog food, which was the original purpose of the long drive. Then I saw that Preen was on sale…not for $29 or $26.97…no, it had been marked down to $19.99 and then further marked down to…be still my heart… $14.99. Woo-hoo. I grabbed two lovely yellow drums.

As I approached the checkout I noticed the clearance area. Jack stood by while I checked…
Horse feed – no, I have no horses.
Beet pulp horse feed – no, still have no horses.
Bird food – no, I don’t feed wild birds.
Ah, here we are. Dog food. Good quality dog food at 1/2 price. Yep, grab two bags of…whoa, these are heavy, how the heck big are these bags? Gonna need another cart.

Then I remembered the garden soil that was on a pallet outside in front of the store. I told the clerk I would like about 4 -5 bags, please, as that’s about all the bags that were not broken. The clerk then said the magic words…”The broken bags are 1/2 price.”Someone else’s voice came out of my mouth and said, “Okay, I will take all of them, broken and not broken” as I quietly tried to calculate if I could fit all this into my little car.

I declined the offer to have an employee assist me in loading the car. One thing I learned is that no one likes to take direction when loading a car. Better to do the job by myself, slow and steady, step by step, take time to breathe, rest, method.

Oh, dear. I need two hands to get this stuff loaded into the car. What to do with Jack? He can’t wait in the car with the doors open; he would jump out and make lots of new friends in the parking lot. If I attach his leash to a signpost, he will most likely pee on the merchandise. Aha!. A helpful customer stopped by. Yes, I happily accepted her offer to keep Jack company while I sweated and strained to load sixteen tons and got another day older – but not deeper in debt. Here is the helpful customer with Jack standing in front of the empty pallet.
Thumb of 2014-08-02/greene/dae59f

Another customer came by and looked as if he would have offered to help, except that he was dressed in white from head to toe I figured he was either an ice cream man, an evangelist or quite possibly a figment of my imagination as I was slightly lightheaded from the heat – or maybe he was just too clean to get dirty.

After what seemed like an hour but was most likely about 18 minutes I finally had all 13 bags of soil stowed in the car, plus 3 bags of dog food, 2 bottles of fly/mosquito repellent for dogs (the fly spray can be used on horses but as you remember, I don’t have a horse), 3 squeaky toys for dogs, and the two tubs of Preen.
Here is my poor little, sagging car: Thumb of 2014-08-02/greene/5d5919

And the trunk is full, too. Okay, the fact is that the trunk was already mostly full of shovels, clay pots, landscape fabric and some tools. So now it is more full.
Thumb of 2014-08-02/greene/7c57b7

Um, what am I forgetting?

I sat down to have a drink of water.
There must be one more thing I need to put in the car. What was it?

Oops, the dog!!!

Here Jack, see if you can find a place to sit. No, there’s not enough room.
Okay, stand. You can stand all the way home. It will be fun. Each person should be able to have fun on their birthday.
Thumb of 2014-08-02/greene/6d4340

It’s my birthday!

(Originally written in August 2014)

Posted on Leave a comment

African Horned Melon, part 2: Everything but the Horns

My friend Plant Sister is at it again, using almost every part of something like food. She says, “I learned from my mother about many things: Do not throw away food or let it go to waste”.
Written by Plant Sister and myself.

While preparing to write the original Horned Melon/Cucumis metuliferus article, I ate the green “jelly” part of the fruit and spat out the seeds. One Horned Melon gave me a single serving of fruit and some seeds. That’s all. No more. Unless you count what I tossed into the compost bin. There was so much wasted that I simply did not “see” as food.

My friend Plant Sister, who lives in southeast Asia, thought my article could have been more complete. She shared with me what she had learned from her mother. Plant Sister wrote the instructions for this article and provided photos and original drawings; I did the editing, adding three photos and a few comments, and I learned a lot in the process!

From a single Horned Melon fruit, Plant Sister can get:
One small bottle of the green Horned Melon juice (approximately 30% juice/70%water),
One small cup of green Horned Melon “jelly,”
One tablespoon of orange Horned Melon “meat,”
Plus all the seeds… “Seed for sharing with people who love to grow their own food,”
Horned Melon Peel, to be dried and later used to make a tea.

Plant Sister thought it would be good to explain how to utilize the many parts of the Horned Melon so that more people could learn how useful this fruit is.  She said, “Thank you for letting me have a chance to tell you about my experience with the method. I took the fruit in my hand and …did it step by step…learning by doing.”

The steps:
—Use scissors to cut each tip of the sharp horn of the Horned Melon as my drawing shows.

Please cut only the hard horn at the tip of each horn to avoid getting jabbed with the sharp points.
Thumb of 2014-10-26/greene/b8e84f 
—Wash the Horned Melon in a salt solution (about 1/2 teaspoon salt dissolved in 3 cups of water). —–Do not rinse. Let air dry.
—Cut the fruit, scoop out the green jelly and seeds; each seed is inside a sac.
Thumb of 2014-10-26/greene/cceee8 Thumb of 2014-10-26/greene/f92a9e

Now we will make the juice/water mixture and retain the green pulp:

—Place a colander into a bowl. Put the green seed sacs into the colander.
—Prepare 60 ml. water. Please use water that has been boiled and allowed to cool to room temperature.
—Pour the water onto the seed sacs. Using a teaspoon, “stir lightly but quickly to separate the seeds from the sacs.”Put the green seed sacs into the colander.


—Reserve the water and use this water to repeat the sieving process again and again until all the seeds have separated from the sacs.

—After the last sieving, save the water, which will be approximately a 30%/70% Horned Melon juice/water mixture. Remove everything from the colander.
Once the seeds and the green sacs/solids/jelly are separated, place each part in a cup: seeds in one cup, solids in another cup.
“In addition to the juice/water mixture we now we have one amount of the seeds and one amount of green sacs/solids/jelly each in a small cup.”
Thumb of 2014-10-20/greene/de7826 Here is a bowl of the green “jelly” after the seeds have been removed.

When I was preparing my Horned Melon, that was my stopping point. Plant Sister takes this a bit further, obtaining more food from the single fruit. She has kindly included her own drawings to show the process.

—Use a tablespoon to scrape the orange-colored “meat” from inside the peel/rind as the photo shows.
Thumb of 2014-10-20/greene/8e767a
The Horned Melon meat is mixed with the water and some coconut sugar and a bit of salt are added.
Thumb of 2014-10-20/greene/0d7fa5
Plant Sister says: “It had a sweet smell of the coconut sugar.”

—Using scissors, cut the outer peel of the Horned Melon fruit into julienne strips. Allow the peel to dry.

Note: if you live in a damp climate you may want to use a dehydrator for this process. “This is the photo of the dried peel, which we can use for tea”.
Thumb of 2014-10-20/greene/2384ca

“I am very happy I can teach the method to other people. This method will be useful to them, and the original article about the Horned Melon will be more complete. Thank you for letting me have a chance to tell everyone about my experience with the method. Please have a good day today. I hope you like ‘all’ the Horned Melon today!”
Plant Sister

Plant Sister’s mother, who is over 94 years of age, will be smiling today, knowing that more people have learned not to let food go to waste. Using Plant Sister’s method you can now use everything but the horns.

Photos, instructions and original drawings by Plant Sister.
Photos by therealmgreene: Horns, Pulp with seeds, Seed in Sac.
Edited by therealmgreene.

Originally published February 2015