Posted on 2 Comments

Busy, busy, busy.

September 5. 2020 –
Hello, what have all of you been up to lately?
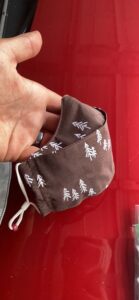
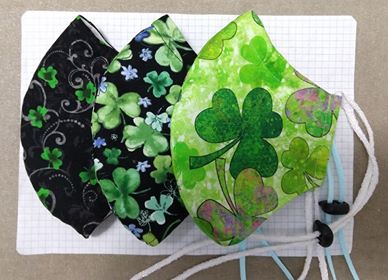
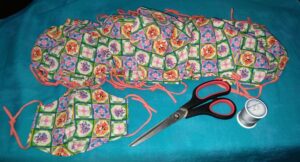
I’ve been super busy sewing facemasks. Sometimes until 3 in the morning.
Here are 24 masks completed in one day.

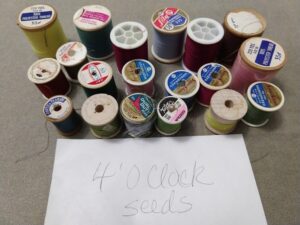
Not selling the masks, just asking for donations. Some people have donated eggs, quarters, potting soil, fabric, thread, dog food and dog treats, more thread, flower seeds, and cash money. One woman gave me a container of cat treats because she doesn’t have a dog. I told her that was fine because none of my dogs can read the label. One man said he couldn’t give me a bag of cow manure because he doesn’t have a cow. Making masks is fun and I’ve met lots of interesting people.

One man liked his mask so much he called me a rock star. Said the mask was ‘state of the art’; after which he asked if I could alter the pattern to include a space for the filters he uses. Yes, of course. No problem.

In between sewing and walking dogs, I’ve finally managed to complete the fenced dog exercise area. It’s large enough for all 4 dogs to run around, dig holes, or just catch some sunshine. While the dogs are busy, I’m out there with them pulling weeds, pruning shrubs, or doing general cleanup. Here is Jack looking very silly and very pleased with his digging work. He’s a digging fool.

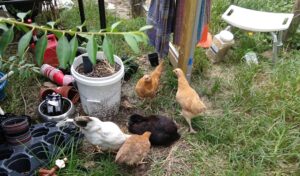
A while back, the chicken named Dottie Junior decided to hatch some eggs. Of the 18-20 eggs, she managed to successfully hatch out 4 lovely baby chicks. Three are hens and have her coloring and are small in size (the first Dottie was a bantam), and the fourth is a rooster that looks like his grandfather who was a Light Brahma. Don’t know if I mentioned it before but a black domestic rabbit has adopted my yard and is getting along really well with the chickens. Here is the rabbit sharing lunch with the hens and rooster.

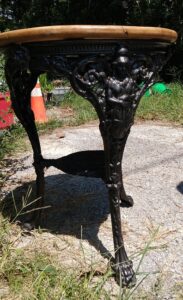
Sometimes I take a break from sewing and dogs to run errands or do a little shopping. Here is a table I picked up for not much money. All I wanted was a smallish table that would fit in a corner…never dreamed I’d end up with an antique cast iron pub table from England. (Sorry for the bad photo but this sucker was heavy!)

One local woman offers specialty fruits and veggies that she imports from her home country. I purchased 8 tamarillo fruits. These are also known as Tree Tomatoes. The currently acceptable botanical name is Solanum betaceum. To be honest, I’ve never actually eaten one; only bought them to save the seeds – did the fermenting thing that I learned years ago; hope it works. The aroma of the fruit is divine! If I can grow these and get a decent harvest, there will be some lovely fragrant jams happening. (The package of Nutter Butter cookies is for size reference.)

Now that the fenced dog exercise area is finally finished, my next project will be to create a screen/blind to hide the trash cans and such. Someone on Facebook Marketplace was selling all these shutters for a whopping ten dollars. They are perfect. Updates as they happen.

Over on The National Gardening Association, they featured American Beautyberry and I was thrilled to see some of my images in the article. I tried to attach a link but can’t remember the correct way to make that happen; try this…
https://garden.org/plants/group/beautyberries/

Well, that’s what I’ve been doing lately. What are y’all doing these days?

If anyone can teach me how to make the comment section work on this blog I might actually be able to read answers.

Posted on Leave a comment

I had a dream

After living in a mobile home for 20 years, I figured it was time to move up in the world so I bought a travel trailer and called it my casita. Since I must do some serious downsizing I’m faced with making difficult decisions. No matter how meaningful any item might be…well if it won’t fit into the ‘casita’ or out in the tool shed I simply cannot keep it. There was no problem getting rid of most things – they are just ‘things’ after all, but the one item I had problems parting with was my sewing machine table.

Here is the story.

When I first moved to Savannah I had to work three part-time jobs just to make ends meet. Eventually landed one good job working at a dry-cleaning store. It doesn’t seem very glamorous working from 7 in the morning to almost 11 pm handling dirty clothes but it sure did pay the bills. I was promoted to manager and a while later was transferred to one of the other stores that my boss owned. It was a 35-mile drive to get to work…and it was like being in a whole other world once I got to know the new place. It was out in the country where people smile, are friendly, helpful, honest, good church-going people. What a contrast to Savannah. It did not take me long to like everyone who walked through the door.

In addition to dry cleaning we also offered alterations. People could drop off their clothes and the alterations lady would have everything finished within a week. That was okay for most people but some had more pressing needs. (No pun intended.) So, what the heck, I carried my sewing machine and supplies to work and set it up in my office to handle the urgent sewing jobs, quick hems, small repairs, slight fitting adjustments, etc.

One mother brought in a pair of nearly-new blue jeans that her daughter had managed to snag on a nail. Rather than the normal patch and repair, I offered the ‘teen special treatment’ using glitzy fabric, sequins, and silver thread. It was a big hit.

The Army Reserves came in and needed the US flag sewn on the sleeves of every uniform shirt in a big hurry. That was very special and required me to drive out to the Reserve building to pick up the shirts and the flag patches. I carried everything back to my office and sewed my little heart out until every shirt sported a patch of our flag. When I presented the invoice to the commander of the unit he was surprised, no, shocked that I charged so little money; it seems that the military had allotted a
budget of $600 (six hundred dollars) for the work but I only charged the going rate of $2 (two dollars) per patch. (I will not talk about government overspending.) I have no idea how or if he would explain the surplus in his budget.

There was the proud father of a Boy Scout – his son was hoping to become an Eagle Scout earning badges as fast as he was able. The father had tried to glue the badges onto a sash but was making a mess so he came to me for help. No problem, I have a sewing machine and know how to use it. Besides, since I lived alone there was no hurry for me to rush home after work. I loved helping these people.

I could relate dozens of stories about these interesting people but…back to the point.

One day an elderly man wandered into the store. He did not come to drop off any dirty laundry. Not to pick up any clean laundry. I had no clue why he was in the store. He was a man of few words. He wandered around the lobby for a while and when there were no other customers he asked, “Do you have a sewing machine table?” Um, er. Random question if I ever heard one but okay, I’ll play along. Yes, I told him I have a sewing machine table in my office. He asked if I needed it. Huh?! Um, this was a bit weird so I figured I’d turn the question around and asked him if he needed the table. Ah, yes, he did. Guess by now y’all know me well enough. Five minutes later, after I relocated my sewing machine and supplies to the floor, the man walked out carrying my old sewing machine table. He seemed very happy to have it. He offered to pay for it but no, I would take no money. As I said, it was just a very weird occurrence.

But not as weird as the following few weeks.

The man, who was about 95 years old and probably weighed maybe 95 pounds, came back to chat…well, not exactly to chat since he was a man of few words. He asked if I had a sewing machine. Oh, no, no, no…Yes, I have a sewing machine but I explained that I needed my sewing machine and it was not available. He asked if he could see the machine. Whew, weirder by the minute. (Yes, Alice, I supposed I could say curiouser and curiouser.) Okay, I led him into the office so he could see my sewing machine. For anyone interested, it’s a heavy-duty Singer school model. He noticed that the machine was sitting on a folding TV tray.

He saw the machine.

Then he left.

Weird. (Cue the Twilight Zone music.)

The next day he came back to chat. He asked me what would be my idea of a ‘perfect’ sewing machine table. Well, weird or not he had stopped by enough times that I felt at ease describing my ideal sewing machine table.

Over the next several weeks he came back many times. He asked questions. Took notes. He even asked me to sit in a chair so he could take measurements. I kind of figured, since he was old, that maybe he might have a screw or two loose. Until one day he walked through the door carrying a sewing machine table! It was unfinished as he was still in the process of building it. Yes, he was building a sewing machine table just for me! He asked me to sit and ‘try it out for size’; he asked me to place my sewing machine into the space in the table top…uh, oh (frowning)…he did not gauge the depth correctly…more measurements…and he walked out taking the table with him.

A few days later he returned. This time he brought the finished table complete with the wooden insert which allowed the sewing machine to sit at the correct height flush with the tabletop. The wood had been sanded and stained a lovely walnut color and yes, it was perfect. It fit like a glove. It was the ideal sewing machine table. And he made it just for me. Think back to that first day when he wandered into the store. I hadn’t charged him any money when I gave him my old sewing machine table. He returned the favor by giving me the custom-made, perfectly ideal sewing machine table for no money.

So here I am downsizing. Cleaning, sorting, donating, and sometimes trashing…everything that will not fit into the casita has to go. There is no room for all this ‘stuff’ so I cannot keep it. Many items have been donated to the thrift stores, some items were given to neighbors, some to my daughter who lives nearby and some to my other daughter who drove seven hours from Alabama to pick up the items that she treasured – an antique school desk, a butcher block rolling cart and a few other things.

But what about the sewing machine table? What am I to do about that? There is zero floor space in the casita, all the furniture is bolted to the floor, and I’m pretty sure I can’t hang it from the ceiling. What to do, sleep on it? No, not sleep on the table, silly! Sleep on the problem about what to do with the table.

And the answer came to me in a dream.

In the RV kitchen, there is a dinette. It consists of a table and two bench seats and yes, it’s all bolted to the floor. The whole thing can be converted from a dinette into a sleeping area. Just lift up the tabletop, remove the two metal legs, stow the legs under one of the bench seats…place the tabletop in the slots and..tada!; it’s a bed. WooHoo! But…hmmm…what if, um, er…could I? Let me see. No, let me measure. Yep. If I lift up the tabletop and stow it away against the wall under the window, then put the metal legs away, the empty space between the two benches is exactly the right size for a sewing machine table. Oh, my gosh. It couldn’t be a better fit if it had been custom made for that space.

Well, that’s my story and I’m sticking to it.

Posted on 3 Comments

Nothing Much is Happening

Posted on Nov 27, 2019 6:16 PM
Today is Wednesday. One day before Thanksgiving. Happy Thanksgiving everyone!

Yep, it’s true. Nothing much is happening around here.

I make plans. Life gets in the way. The several loads of free composted horse manure turned out to be contaminated with residual herbicide so I lost my entire garlic bed. I had also added the composted manure to a new garden bed, added coir, pine fines, and all the good stuff one does when creating a new planting bed. I got a bit sick and didn’t actually plant anything in the bed but mysteriously, there were zero weeds growing in the bed. Huh? That’s when I started researching and learned about the evil thing I had brought home to my garden. It was a huge waste of time and money and all that soil will need to be removed and replaced. Sigh.

There were some trees I’d been looking for and wasn’t able to find anywhere. Everyone was sold out. I worked with one plant nursery who was finally able to locate the trees for me. I bought 4 trees, over $88 plus shipping costs. I had put the trees in a 5-gallon bucket with some good garden soil until I could dig holes and get them planted. And…well, you guessed it. The ‘good’ soil is from that new bed so I lost 3 of the 4 trees and one is barely hanging on to life.

Back in September, there was a mandatory evacuation order as Hurricane Dorian was expected to hit my area. Instead of evacuating (and where does one actually go with 2 dogs and something like 14-15 chickens?), I drove a bit inland and adopted a dog. He is so cute and funny that he makes my face hurt from all this laughter. z

His name is Chico Burrito.

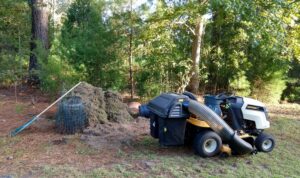
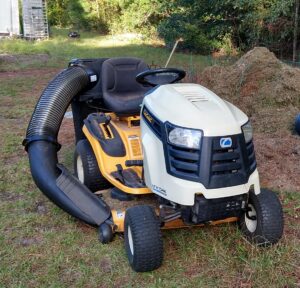
Mowing over an acre of grass and weeds with a push mower was getting tiresome so I researched and learned how to repair the Cub Cadet riding mower that’s out in the big shed. I replaced the battery, repaired one tire, drained the old (ancient) gasoline and was thankful that the old gas didn’t cause any major problems, added new gas (non-ethanol, marine gas) and then had to get my limbs coordinated to go forward and reverse and make turns without tipping the mower over on its side. After that, I decided that raking over an acre of grass and weeds and hauling it to the compost bins was…well, just plain idiotic so I researched and ordered a bagging attachment. Whew, the box was large and heavy and somehow I managed to install it. Works great. Here, look at the huge pile of clippings.

As the chickens grew, I removed them from the house to the shed, then to the coops in the garden area. Yes, coops as in more than one. Eventually, the chickens decided they were grown and no longer wanted to be put inside the coops at night. Find, you wanna be grown? Be grown! But don’t complain to me later.

Some of the chickens were roosters and honestly, I only need one, so little by little I have been giving away roosters. I gave one rooster and a hen to my former neighbors who stopped by for a visit. Last week I gave away 3 roosters to a man who was looking forward to his Thanksgiving dinner (oops!) There remains one rooster that I am unable to capture. He’s just too smart. Time will tell.

Since the chickens are grown and now select their own sleeping place in the evening, I no longer have to round them up in the evening. Unfortunately, the sleeping place that some selected was not very secure and I lost one hen to a very hungry Great Horned Owl. It took that owl 3 days but eventually, all that was left were a few stray feathers. Owls have very good table manners.

Let’s see. I did mention that I got sick? Well, I got sicker. I lost a ton of weight and my hair fell out. Ugh! So I bought some wigs and…laughed myself into insanity. No way could I actually go out in public wearing a wig. I created a collage of how silly I looked.

After living without hair it was quite a surprise when it started to grow back. Here is my “Before, after, and after” picture.

My neighbor will be moving and the new people have 5 dogs so I’ll be installing a 6-foot privacy fence. Hmm, I’d better get cracking and finish installing the fence to keep the chickens contained. So far there have been 9 cedar fence poles and 6 T-posts installed. Yesterday I purchased more T-posts. Wish me luck. The plan is to fence a perimeter around the house where the dogs can play, to close in the garden area to keep the chickens from straying too far (and annoying the new neighbors). The Cub Cadet has reminded me that wide gates need to be included in this plan.

For about 3 days I was very happy because a homeless person offered to help with some of the work. He worked hard for one day – I paid him. Worked sort of hard for the next day – I bought him new shoes and some food. And the third day he stole what he wanted. I paid him for the first two days so I guess we are about even as far as money goes.

Speaking of money, sheesh, I need to find enough money to replace the HVAC system. Mine is just plain too old. It has the old type of Freon. The good part is that the new system will be more efficient and will save me money on my electric bill. Now…if only I had a spare $5,285.00 laying around the house. 🙂

Almost forgot. In my spare time, I volunteered to help transport dogs that are going from foster to their forever homes. The group is Echo White Sheperd Dog Rescue. On Tuesday, December 3, 2019, Facebook is having Giving Tuesday and will match donations up to a certain amount but the money runs out very quickly so…if you’re not busy at 8 am (Eastern Time), why not chip in? There’s a link at the end to explain more.*

And just in case you can’t watch the clock that closely, there’s what I call the equivalent of ‘early voting’. You can send your donation early (only a few days left!!) and the monies will be pooled and donated by the group at the correct moment in time. Use this link for early donations:
https://paypal.me/pools/c/8kirGynR2r

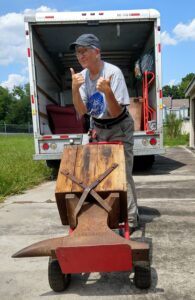
Here is one more picture. For anyone who is a bit overweight and trying to lose a few extra pounds, be careful what you wish for or you could end up looking like me. Yes, that’s me and I am moving a 148-pound Sodefor anvil made in Sweden back in the 1920s. (It’s okay to laugh!)

The next project on my to-do list is to make a new chicken enclosure from an old 12-foot trampoline. Wish me luck!

*More information:
https://www.facebook.com/help/332488213787105
https://www.facebook.com/groups/echodogs/

UPDATE: Feb 5, 2020
Not much is happening but a weasel got into the chicken coop and killed 6 of my best hens and my favorite rooster. Some of the chickens had been roosting in the trees and they were spared. My entire flock now consists of 2 hens and 2 roosters. Guess I’ll have to dust off the incubator and get cracking. Ooooh, bad pun!

Posted on Leave a comment

Dog Diapers

Do dog diapers work? Hmmm, I wonder.

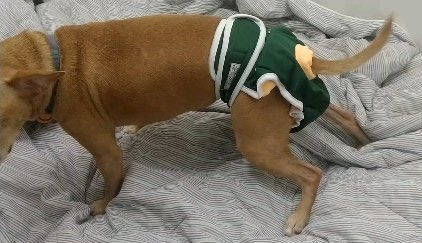
Not long ago I purchased one dog diaper from a company called Dog Quality; the diapers are called Washable Wonders. The price was very reasonable. My dog Jack is not incontinent but he had spent some time in a wheelchair so I figured having a diaper on hand would be a good idea.

Recently, Jack had a medical issue which required several visits to the veterinarian and about $700 in office visits, tests, medications, etc. Free dogs are never really free, are they?

Rather than tell you about the Washable Wonders diaper, let me tell you a short story.

Here goes…

Two days ago my dog Jack ate something he shouldn’t have. It was a tube of Nystatin antifungal cream. I quickly checked online, then checked with poison control, then called the veterinarian all in the space of a few minutes. Whew, no worries. Jack will be okay. The vet said to keep plenty of water available and that Jack may have vomiting/diarrhea; forewarned is forearmed – I have spray cleaner, paper towels, trash bags, and know how to use them! I also gave Jack some plain Greek yogurt to help his tummy troubles.

Next day…Jack is fine. Things seem normal.

This morning…4:00 a.m. and it’s still dark outside but Jack keeps pacing and seems to need to go outside. I put collars and leashes on both Jack and George, we step outside just as the sky bursts open and rain pours down. Jack managed a quick pee, George said, “No way!!” so we went back inside. I dried both dogs then we all settled down.

A little while later Jack comes to me and wants something. Okay, I’ll play the guessing game…snack? squeaky toy? ball? play? I tried all of them and for a few minutes, everything was good. Then Jack did a very funny thing. He kept going where his diaper is. Over and over he went to the diaper. I asked if he wanted his diaper and he did the “happy dance” so, what the heck, I put the diaper on him and he seemed pleased. Did I mention that Jack loves his diaper?

We settled down again. I’m busy working on the computer and Jack comes into the room and. And uh-oh…I smell stinky! Someone passed gas. I think the dogs need to go outside again. I put the leashes on both dogs. We exit the front door and are on the porch when I realize that Jack is still wearing his diaper. “No, Jack. You cannot wear the diaper to go outside.”

This next part will be either gross or extremely funny depending on your experience with dogs. Since I need one hand to hold both leashes, I use my other hand to pull the Velcro (or possibly generic hook and loop tape) off the Washable Wonders diaper. The Velcro is easy to remove. In less than one second, and working with only one hand, I managed to remove the diaper, toss it through the open door and onto the living room floor…the diaper landed about 2.5 feet from the door…get ready…here it comes…and the huge pile of poop landed about 1.5 feet from the door!!!

Jack does not normally have incontinence. I only purchased the diaper because I have to put antifungal cream on him and the diaper prevents him from licking the medicine. Didn’t stop him from eating the entire tube!

But I have to say…the diaper is amazing. I looked at the huge pile of juicy poop on the floor and was grateful that I do not have carpet in the house. I looked at the diaper which was almost completely clean. Then I looked at Jack’s hind end…and it was absolutely clean. How is that even possible??? Who cares! This company is making an amazing product. Keep up the good work.

Okay, I’ll admit that I still don’t like the color of the inside fabric and really don’t like the ‘bullseye’ that fabric creates around the tail hole, but at this point, who cares!! The diapers work and that is all that matters.

I just now finished washing the diaper by hand in the sink. It washed really well and I am air drying it since it is still raining outside.

The name of the company is DogQuality. They are in Canada. Please go to their website to see the products – they make more than just diapers. There are also some helpful videos featuring some adorable dogs. You can buy DogQuality products from other companies but why not buy directly from the source?

https://dogquality.com/collections/dog-diapers

Posted on Leave a comment

The Bathroom Plant

Was it 1966? A friend of a friend was looking for temporary workers, just a few. Seems there was a new fad in town – terrariums. He did the math; tall glass vessel + soil + a few small plants = cash for college. He set up a kiosk at the local shopping mall. To call it a mall is laughable compared with today’s monstrous shopping arenas. His terrariums were selling fast and he couldn’t keep up with demand on his own. He needed help and he needed it fast…and cheap.

So we stood in his garage, a motley crew of skinny teens. If you’ve ever attempted to assemble a terrarium you’ll soon discover that you are all thumbs and elbows. We were paid fifty cents for each completed terrarium – and we worked quickly. We soon developed little tricks to get those feisty plants tucked inside the tall glass containers. We used wire, forks, anything that came to hand. One particularly busy day, our ‘boss’ thoughtfully supplied a lunch of Chinese take-out and we discovered that chopsticks could be modified and fitted with all manner of appendages to aid us in our task. Our creations were selling for five to ten dollars each.

A short time later, I started working at a real job. After school and weekends and full time in the summer, I was a floral designer. At work one day I was holding up my end of a friendly conversation and I remarked how industrious that young college student had been to start with nothing and develop his own terrarium business. My boss, who had been in the floral business forever, commented, “Well, the young man knew what he was doing; his mother owns Lola’s Flower Shop across town and is our biggest competitor.” Oops!

A few years later, walking through the same mall, I passed a display of lush hanging plants. A few sprigs had fallen to the floor and were doomed to be victims of the broom. I picked up an extra long piece of some unknown plant, playing with it as I walked – twirled it, threw it in the air, wrapped it bracelet-like around my wrist, then stuffed it into a pocket. With my vast experience manufacturing terrariums, I had big plans to make a terrarium of my own with that little sprig.

Arriving home, I stuck the little plant sprig in some water, set it on the windowsill and forgot all about it. Later I did manage to create several terrariums of my own, but the little plant never made it from the water into any of my terrariums. Weeks later, when I looked at the little plant, it had quite a nice bunch of roots, so I planted it in a pot.

That little plant has been through one marriage, two apartments, 3 houses, two children, one divorce. The still-unidentified plant usually lived in the bathroom and, for lack of a better name, it was known as ‘the bathroom plant’. The plant traveled along with me when I moved to South Georgia. Imagine how surprised I was to find that the lush, green weeds growing all around my new home looked suspiciously like the bathroom plant.

The research revealed that my little plant had a name, a proper name. Tradescantia fluminensis! Sure, it still lives in the bathroom; it’s happy there. But on days when the rain is gently falling, I set it outside to have a little shower with its Southern cousins.


Posted on Leave a comment

It’s a Native Bee Nursery!!! …um, no, it’s not.

Someone was kind enough to give me a table. They helped to load it into my small car but when arrived home and tried to move the table from my car to the house, it was too heavy for me to move on my own. After a good deal of grunting and cursing, I finally managed to get the table onto the front porch where at least it won’t get rained on. Here it is, weeks later and the table and the legs are still on the porch. If anyone stops by to visit I will beg them to help me move the table inside the house and maybe they will help to attach the legs.

But wait…no…I cannot bring the table into the house just yet.

Why not?

There are holes in the underside of the table – but wait, I forgot to say that the tabletop is laying on its side so the screw holes are horizontal. This attracted a very small, mostly black bee and she’s been laying eggs in the screw holes of the table.

The tiny bee has gradually been filling each hole with eggs and sealing the hole with mud.

Where is she getting the mud? 

I have a lovely hole in my driveway which I filled with clay and small stones. Some day I will repair the hole properly. Every time it rains, the hole is a mud wallow mixed with good old Georgia clay and that’s exactly what the bee needs to seal the holes. The small stones assure that she will not drown while collecting mud.

Seems like procrastination works in the bee’s favor.

She was kind enough to land for a moment so I could get a glimpse. She is mostly shiny and black, her abdomen is somewhat striped with white. After her short rest, she went back to work so that’s all I have to go on for an identification.

I found a link to help identify bees. Looking at the images in the link, I think she may be a sweat bee. If she stays still again and I have a camera I’ll try to get a photo.

htts://www.mnn.com/your-home/organic-farming-gardening/stories/how-identify-different-types-bees

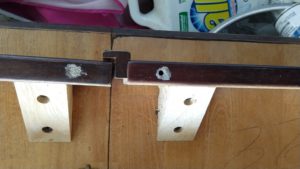
Here are the screw holes in the table. The hole on the bottom right is the one she’s working on. The hole above that one is sealed.

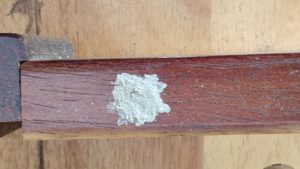
This is one of the holes sealed with clay and mud. 

After doing some research I learned that the bee lays female eggs first and lays the male eggs last. The males hatch out first and hang around waiting for the females to emerge. I have more research to do. I need to know how many weeks or months the table has to stay on the porch so the bees can hatch out.

Since there is a constant source of mud/clay/water and plenty of flowers blooming late in the season, all that needs to be done is to make some bee hotels so the bees can have a more appropriate place to lay eggs next time.

UPDATE: Feb 5, 2020
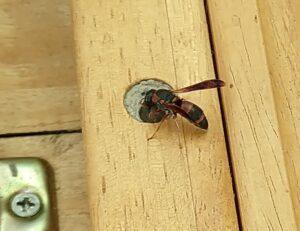
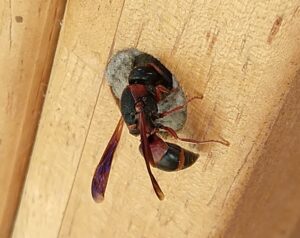
It has taken a long while for me to revisit this post. It’s not a bee nursery. It’s both a bee and a wasp nursery. In addition to the original yet unidentified bee there is a Red and Black Mason Wasp using the table as a nursery. This wasp is also known as Pachodynerus erynnis.      

Here are some links if you want to learn more.

https://en.wikipedia.org/wiki/Pachodynerus_erynnis

https://aggie-horticulture.tamu.edu/galveston/beneficials/beneficial-39_red_and_black_mason_wasp.htm

https://bugguide.net/node/view/6244

I was happy to grab a few photos. Here is a video that someone captured of the wasp on a flower. Don’t blink; the video is only 3 seconds long.

https://www.youtube.com/watch?v=xdxbx3jEweo

Well, it has really been a long time. All the little bees and wasps have hatched and flown away so I was finally able to give the table to my neighbor. In the spring, I’ll make an effort to create a new bee and wasp nursery. Wish me luck.

Posted on Leave a comment

Free is good, aka: Let’s keep it out of the landfill

To fully understand this blog post, you need to know that I was born and raised in Connecticut and only recently (25 years ago) relocated to the Savannah, Georgia area.

Thumb of 2018-09-13/greene/dac5b5

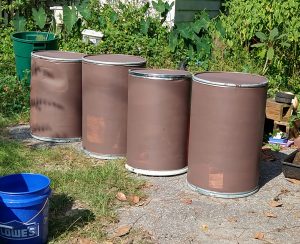
So…I responded to an item on Facebook Marketplace. Hey, if you don’t already know about this, do yourself a favor and check it out in your local area. Someone in Savannah was offering cardboard barrels for $2 each. I had already known about these barrels from when I was the manager of a dry cleaning store. As long as these barrels are kept indoors, out of the weather, they can last a really long time. I had one for over 20 years. It originally contained starch but I used it to hold plastic beads for craft work.

The seller of the barrels and I communicated back and forth and it was arranged that I would pick up the barrels; I brought cash money – exact change. Yep, I brought cash money, but the seller did not actually want any money. Seems like he just wanted to re-home the barrels. I’m cool with that. Together, he and I loaded 4 of the barrels into my tiny car. I had some rope and the man tied some spiffy knots that he had learned courtesy of the US Army to secure the barrels. I suspect his knowledge of knots might be hereditary, ingrained from the Mayflower days. It was decided that I would return shortly to pick up a few more barrels.

After fortifying myself with a cheeseburger and fries from the local Checkers I arrived home, unloaded the barrels, gave the leftovers from Checkers to the chickens (they did not care for the fries), I drove back and started loading more barrels into my tiny car. The man’s sister arrived to offer assistance. Together, she and I loaded 4 barrels into my small car. It was a task and a half. The barrels weigh next to nothing but since they are round, they tried to roll out of the car a few times. All 8 barrels are now safe and sound inside my house and will soon be filled with all sorts of stuff…Perlite, Vermiculite, peat moss, rabbit pellets, chicken food, Timothy hay (that’s the good stuff)…whew, the list goes on. I plan to seal and paint some of these cardboard barrels so they will last a good long time. Note to self: Find out what kind of paint is good for cardboard barrels.

Okay, history lesson. The family giving away the cardboard barrels arrived in America around and about the Mayflower era. A long time ago. The great-grandmother had an idea and…well, her idea has been supporting the family for four generations. Yikes!! If you want to buy some spring clips manufactured and sold by the Gibson company – totally made in America, look them up online. The company has roots in Bristol, Connecticut and the spring clips are shipped to Savannah for packaging and distribution. Just like me. I started out in Connecticut and ended up in Savannah. How cool is that?!

Here is a link to get you started. There are other sizes available.
http://www.gibsongoodtools.com…

Update October 5:

I picked up a gallon of what I call ‘goof paint’ for $9, regular price $36.https://www.homedepot.com/p/BEHR-Premium-1-gal-SC-129-Chocolate-Solid-Color-Waterproofing-Exterior-Wood-Stain-and-Sealer-501301/204166129?MERCH=REC-_-PIPHorizontal2_rr-_-204166116-_-204166129-_-N

It was easy to work with and easy to wash off my hands, and the wall in the hall, and the light switch…never paint when you are tired! But the barrels are now a lovely chocolate brown color.

Posted on Leave a comment

All This and the Kitchen Skink.

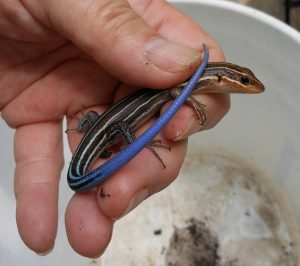
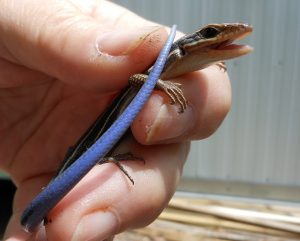
The other day there was a Skink in my kitchen.

Skinks do not belong in the kitchen.

Yes, I admit that my house is disorganized with entirely too much stuff, but I have never described my mess as “Everything including the kitchen Skink“.

Well, I spent a few nights worrying like an overprotective skink-mother. Why were you worried? Because there are two dogs in the house and one of them (I won’t tell you that his name is Jack) tries to eat lizards even when they taste nasty. Eeeww!

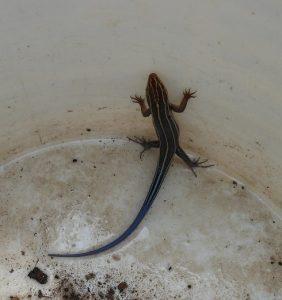
The next day Jack and I were walking around in the yard. He likes to jump up onto the deck. Okay, the truth is that he is too short to make the leap; I actually have to lift him up there, but let’s keep his dignity intact and say he jumps up all by himself. He noses around for a minute or two hoping for a tasty morsel. Wood roaches are tasty. Then he makes a mad leap and dives headfirst into a 5-gallon plastic bucket. Whoa!!! It could be anything – a snake, a spider, an inch of water he could drown in. Doesn’t Jack read the warning on the side of the bucket? 

No, Jack no. Please, just let me have a little look first.

Well, would you look at that!

Here, look for yourself –


Let me get in a little closer – here you go –


Isn’t that just the cutest Skink in the whole world. It’s kind of dark in the bucket; we need a closer look, please.

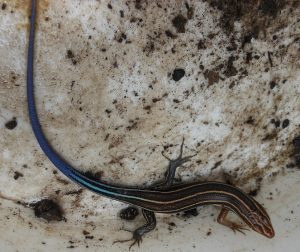
C’mon into the light Skink, show us your pretty blue tail… 

Fun time is over. The Skink is developing an attitude and it’s time to turn it loose.

If there is a lesson to learn it is this:

If a Skink can find its way into your kitchen, it must also know how to let himself out so don’t lose any sleep worrying about it. Also, if you keep plastic buckets around to catch rainwater, check them not only for mosquitoes but for Skinks as well. Maybe you should write a tutorial showing how to make screen lids for 5-gallon buckets? 

For more information about lizards with blue tails, check this link for Hilton Pond:

http://www.hiltonpond.org/ThisWeek071001.html

Eumeces fasciatus = Five-lined Skink

E. inexpectatus = Southeastern Five-lined Skink

Taxonomists are forever changing the name of things. Here is the Catalog of Life page for the Five-lined Skink with the currently accepted name Plestiodon fasciatus. Who knows? By the time you read this, the name could change again!

http://www.catalogueoflife.org/col/details/species/id/7083c8e865d1e893839b07e3fa809dce

Plestiodon laticeips = Broadhead/Broad-Head Skink. Hmmm, apparently, using the V-shape marking on the head is not the proper way to identify a Skink. There are three types of Skink residing in my part of the world and when they are young, they can look alike, having stripes and a bright blue tail. A better way is to count the labial scales – I see 5 scales so I think that my Skink is an immature Broadhead Skink.

This link shows where the labial scales are located:

http://www.virginiaherpetologicalsociety.com/reptiles/lizards/broad-head-skink/broad-headed_skink.php

Posted on Leave a comment

American Beautyberry Jelly

A lovely, bright, vibrant jelly can be made from the berries of the Callicarpa americana. Yep, it’s All-American and easy as pie! These are American Beautyberries.

Thumb of 2013-10-10/greene/c989ad Thumb of 2013-10-10/greene/5bcf9a

It always makes me happy to watch the mockingbirds enjoy this fruit in the fall of the year, but I didn’t know people could enjoy it just as well. After doing the research, I found that there is one basic jelly recipe all over the Internet, but people were reporting varied success.

For the sake of honesty, I will admit that my first batch of American Beautyberry jelly was a little less than perfect. But iI did manage to make a tasty syrup. We enjoyed the syrup on vanilla ice cream, on pound cake which had been spread with homemade yogurt cheese, and on angel food cake.

So I tweaked the recipe a bit. Yes, I added apples and some lemon juice. I also changed the timing. When the all-important “timing” is mentioned in the original recipe, I completely ignore the second hand on the clock and look only at the jelly as it falls off the spoon – I am waiting for the jelly to talk to me and tell me that it is ready.

I harvested about half of the American Beautyberries from four bushes without regard to measurement, leaving enough for the birds. Never having picked these before, I found I was a little heavy-handed at first and squished quite a few before I developed just the right gentle touch required to coax the berries from around the stem. Love the sound as they plink into the stainless steel bowl. Learning from my experience with “wildlife” living on the berries, I placed the covered bowl in the fridge for the night. The next day as I propped up my legs and watched some old black and white television shows, I carefully cleaned the berries, picking out any green bits of plant material and any berries which were underripe. The berries had a nice bath in several changes of cool water. Okay, now we cook them to make the infusion.

(Before you do this next step please look below for the update, thanks.)

Place the berries in a heavy pan, just barely cover them with cold, filtered water, bring up the heat, and go pay some bills or make a phone call. About 20-30 minutes later you can mash the berries – use a potato masher, a wooden spoon, a clean 2 x 4 – whatever works for you. I use either my vintage 40s Samson masher, which lost the green paint on the handle years ago, or my Mom’s old Ekco potato masher:
Thumb of 2013-10-10/greene/b1487c Thumb of 2013-10-10/greene/515c6e
Line a colander with a clean cloth (flour-sack dish towels work great) and place over a large bowl, pour in the mashed berry/water mixture and let it drain without any further mashing or squeezing to get a clear jelly without cloudiness. At this point, you can cover and leave the whole set-up in the fridge until tomorrow if you like.

Cut up 3 Granny Smith apples, place in a pan with water, and cook until they are soft enough to mash – time approximately 25 minutes. Give them the same mashing treatment and set them to drain in a separate colander setup. Yes, you people with the well-stocked kitchens and impressive normal coordination could have two pots on the stove simultaneously stirring with two long-handled spoons, but that won’t fly in my kitchen. I am dyslexic, so it might just be flying all over the stove.

Pretty much everyone knows the drill about sterilizing jars, so I’ll skip to the good stuff.

Using the basics of a recipe which may or may not have originated on the Eat the Weeds blog, possibly as an altered elderberry recipe, I started by measuring the Beautyberry juice into a very large, heavy pot. Didn’t have quite enough juice, so I added the apple juice to measure a full 3 cups total. Add one box of powdered Sure-Jell. Yes, I know my favorite pectin is liquid Certo, but I was already messing with the recipe and didn’t want to jinx it; besides, Certo is added at the end of the cooking and I’m not re-writing history here. then add the strained juice of one lemon. My mother usually added just a small piece of butter (from a cow, not from a chemical factory) at this point, not even a 1/2 pat, and it would keep the jelly from foaming too much. Just a small note here. When you add lemon juice it’s okay to use the bottled lemon juice as that has a consistent amount of acid whereas using an actual real lemon does not.

Turn the heat on high and have a good long spoon to stir the juice. Keep stirring until the mixture comes to a full, rolling boil. If you have never seen a full, rolling boil with your own eyes, check several YouTube videos – it can be very frightening to see the jelly climb up and almost out of the pot and can be extremely dangerous and messy if the pot is too small – ask me about my very first experience in my own mother’s kitchen! No, she never did forgive me for the sticky mess, sorry to say.

You may want to shut off your phone for a while as you really have to pay attention to the liquid as it comes up to temperature. Dump in the pre-measured sugar – carefully because that’s hot stuff you are working with and this stuff can spit like lava; the scar remains on my right arm from the aforementioned incident. Keep stirring and don’t stop for anything until the full, rolling boil happens again.

It is at this point that most recipes will tell you to watch the clock’s second hand for exactly one minute. Some recipes might even say exactly two minutes. Don’t believe it. Don’t watch the clock. Watch the spoon. Lift the spoon horizontally above the pot, tilt the spoon slightly and watch the liquid coming off the spoon. Do this every 15 seconds and gradually you will see the jelly start to change. It might be one minute or 1 1/2 or 2 minutes. Don’t argue with the jelly. I have had some stubborn jelly that wanted its full 3 minutes of fame. This not rocket science; it all depends on the moisture and pectin content of the berries as well as the temperature of the juice mixture, the barometric pressure, humidity, altitude….hmm, not rocket science, eh?

My little trick was to use the apple juice. Most people who are a little short of juice will add water, and recipes even tell you to add water. But by adding the juice of the unpeeled cooked apples, it increases the amount of natural pectin in the mix without watering down the juice mixture.

By now, you have all your jars and lids ready to go, so shut off the heat and use a clean spoon to skim off the residue from the surface of the jelly for about one minute. I put the skimmings into a clear jar as some usable jelly will settle to the bottom and provide good samples.

Fill your jars, keep the rims and threads clean, hand-tighten the lids, and either:

– quickly invert the jars so they sit upside down for one minute, then return to the upright position, or
– process in a boiling water bath for 5-10 minutes, or
– a third option is to pour 1/8 – 1/4 inch melted paraffin wax on the surface of the jelly in each jar making sure the wax seals completely to the edge of the jar. That’s going old school. Later you can add little circles of gingham cloth and tie with a ribbon. Granny would be so proud.

Let sit undisturbed for 24 hours in a draft-free location as the jars cool.

What? I can’t even have a taste until tomorrow?
Well, sure you can, there is a nice sample in that skimmings jar, remember?

Thumb of 2013-10-10/greene/8eb5a6

How does it taste? Mmmmm, good and sweet, a little tart, kind of tangy. Oh, and the color…

Thumb of 2013-10-10/greene/dbcd17

Remember, even if you mess up with the timing, you may still end up with very colorful, tasty syrup!

Originally published November 2013

When I first wrote this article it wasn’t so much a recipe as a recipe for potential disaster, but for those who asked for measurements I used 4 1/2 cups of sugar to 3 cups of juice, the juice of one lemon which I did not actually measure, one box of powdered Sure-Jell and less than 1/2 pat of butter. Please consult an actual recipe if you attempt to do this at home.
For those who prefer recipes that look as they do in cookbooks:

1 1/2 quarts beautyberries, well washed

2 Quarts filtered water

Boil together for approximately 20 minutes, mash to extract the juice from the berries.

Strain through a jelly bag or several layers of cheesecloth or a flour sack towel.

Set a large, heavy pot on the stove. Measure 3 cups of juice into the pot, add lemon juice and 1 envelope of Sure Jell plus 4 1/2 Cups of granulated sugar. Stir. Cook over medium heat until sugar is dissolved. Increase heat. Add a pat of butter. Stir and bring to a boil. You are looking for a full rolling boil. It may take 2 minutes or longer.

Remove the pot from the stove. Wait until the foam rises tot he top then skim off the foam.

Ladle into sterilized jars leaving about 1/2/inch headspace, wipe the rims and threads, add 2-part lids and hand tighten. Please consult a proper canning book for the best way to process the jars.

Update:

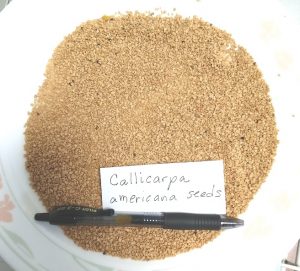
I learned something from my Plant Sister who lives in Thailand. She told me how to extract seeds. I used her method to remove the seeds from the beautyberries before I cooked them that way the seeds remain viable and can be shared, sold, or planted. Here is the method: Place some of the washed berries into my Oster blender with just enough water. Push a few buttons on the blender. The skin and pulp will rise to the surface of the water and the seeds will sink. Pour off the pulp and water, collecting the pulp in a sieve and the water in a bowl. Pour off the seeds – these will later be cleaned and dried. Reuse the same water to process the berries until all the seeds have been removed. Since I have well water, I used bottled spring water or filtered water for this. This same process can be used to remove the seeds from fresh elderberries.

Update: October 2018

Did some foraging and collected American beautyberries to make jam or jelly. I used the Oster blender to remove the seeds from the pulp so I could share the seeds with plant friends. Here is a dinner plate full of lovely seeds.